Robo Boogie All Stacked Up!

My first quarter project as a Benartex Ambassador was oh so much fun to create! It’s a familiar quilt pattern in our Colourwerx catalogue of patterns called ‘All Stacked Up’. The beauty of this ‘looks complicated but it’s not’ pattern design is that it’s oh-so-easy to piece and it looks great in almost any fabric collection out there.

For the fabric I chose a new collection that is super sweet and cute called ‘Robo Boogie’ designed by Irene Staal from Sugaridoo Designs. This new collection from Irene is super cute – the colors are fresh and modern and the designs range from playful robots, widgets, digits and all things that look like computer code. They’re geometric elements; tiny squares, dancing half circles and quirky triangles. Irene’s love for color and her background as a robotics engineer, merge perfectly together in this fabric line.


I started with (1) Fat Quarter bundle of ‘Robo Boogie” and a light gray background fabric from Benartex Fabrics’ Basics line called Chalk Basics. After cutting all of the fabrics according to my ‘All Stacked Up’ pattern instructions, I paired fabrics together to make the blocks. Looks at the super cute designs on the fabrics and the fresh happy colour palette!


Then I made Half Square Triangles for the day. I love this type of familiar repetitive stitching and trimming as I can relax and plan out other projects that would be fun to make! Lots of stitching and lots of trimming!


Then I got my scant 1/4″ sewing mojo going and started to piece the blocks. It was a piecing party with just me and my trusty BERNINA. This is the truly satisfying part about patterns like this – once the fabrics are paired, each pairing of fabrics is pieced in the exact same way to create (3) identical blocks – but take note that one of the blocks’ seams should be pressed in the opposite direction from the other two blocks.

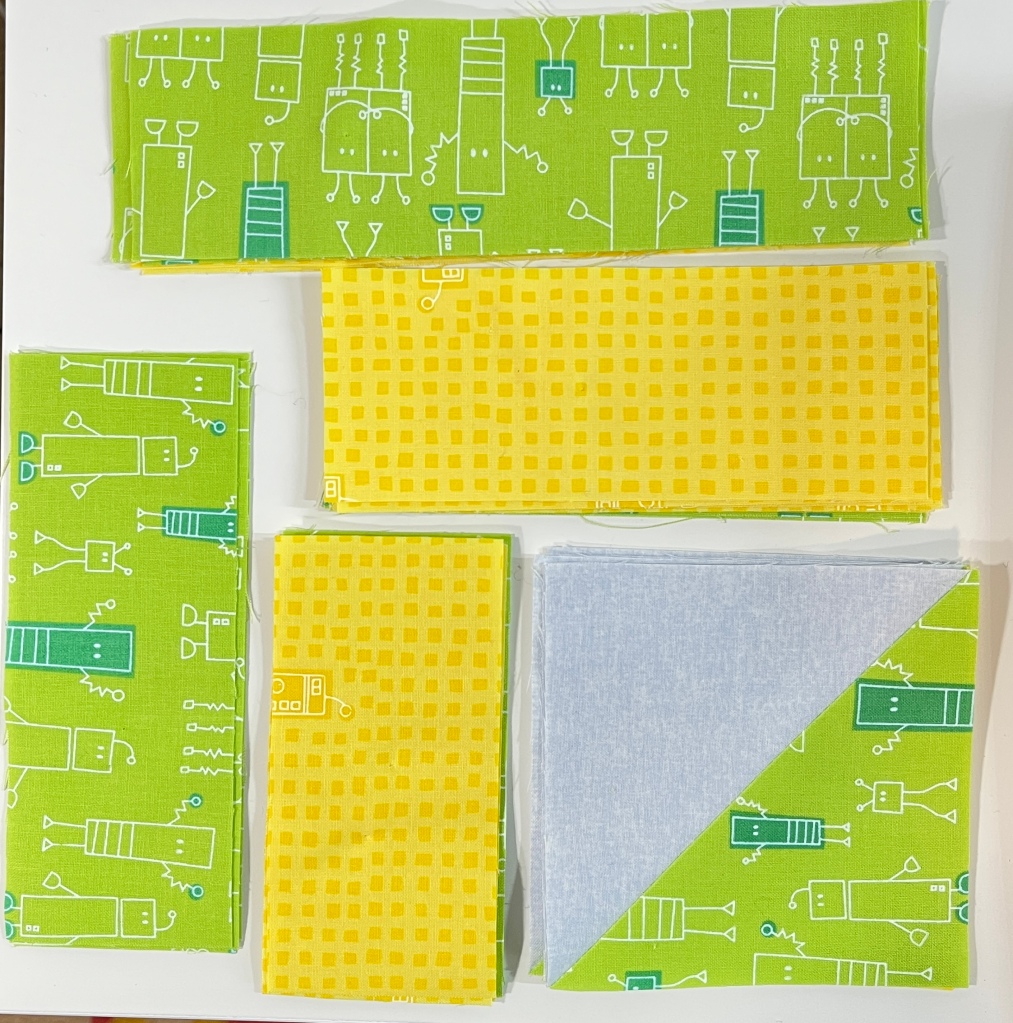
Check out the variety of combinations and blocks that I made – I love the fabrics as the colors are bright and happy and the robot designs are just oh-so-cute!!


Once all the blocks were made, I was ready to start laying out the blocks according to the diagrams in our ‘All Stacked Up’ pattern and start to stitch blocks together to form rows – and then rows together to complete the quilt top. Yay! Almost complete!~


Once the top was completed, I choose a backing fabric. What do you think? This is an Alexander Henry piece from the “Ghastleys” fabric collection. I thought it complimented the fabrics well!


Next it was Teresa’s – at Quilting is my Bliss – turn to do her magic machine quilting. She always does such a wonderful job with all of our quilts and this time was no exception. She chose a fabulously modern edge to edge pattern and quilted the top with a light lemon yellow colored thread. Perfection!


For the binding, I chose to use the teal colored stripe from the collection and cut it on the 45 degree bias so the stripe ‘candy-caned’ down the edges of the quilt. I alway stitch my binding on by machine through the whole process – no hand stitching here! If you’d like to learn my fast method of stitching binding on by machine, I have a tutorial that you can view right here!


Voila! All done…..All in all, it was super fun quilt to make for my for my first ambassador project!

If you’d like to make one of your very own, we currently have ‘Robo Boogie’ fat quarter bundles available in our Colourwerx shop. To make this Small Lap Size (57″ x 65″) you’ll need just one fat quarter bundle with 20 FQ’s, 3/4 yard of a neutral background fabric and the All Stacked Up pattern.

Now I’m looking forward to my 2nd Quarter Ambassador project where I’ll be getting wonky and curvy in the same quilt! Thanks for following along and until our next colour fix! xoxo. Linda

The “X” Project for Benartex Fabrics!

Our first group assignment with the Benartex Fabric Ambassador Group was for each of us to create a small wallhanging featuring the “X” design. That’s the “x” at the end of the word Benartex that is so prominent in the logo of Benartex Fabrics.

Each ambassador was assigned a basics fabric group from the catalog of Better Basics to create their “X” project with. Our design could be anything we liked but it had to be around the size of a fat quarter or 18″ x 20″.

I chose to use the Equinox Basics from Benartex because of their super saturation, range of color and fun scroll design that creates movement and texture across the fabrics.  I wanted to make a small wallhanging for my sewing studio that celebrated my year of being part of a fantastic team of fellow designers with Benartex Fabrics. 

I took inspiration for the background strip piecing and the center “X” medallion from the “Benartex Benefits Club” Logo which I discovered on the Benartex website. Loving all things ‘colourful” this was a perfect way to showcase the gorgeous colors of the Equinox fabrics as well as prominently display the “X” in my piece. 

After cutting 1″ strips and piecing the Equinox fabrics together, my initial thought was to leave it as is.

But then I thought “wait!…..why not cut them apart into 3” strips?”…. and then restitch them back together offsetting them strip to strip. Oooo – yes -that looks far more interesting to me!

Once pieced, I sandwiched together some scrap batting and an Equinox Fabric Fat Quarter and began to machine quilt the background. I used a variegated Aurifil thread and also Stitch #4 on my BERNINA 750 QE which really looks like a zig zag when you select it, but with a little fine tuning of the stitch width and length it can look like a groovy serpentine!

I then printed the center white medallion with the Benartex Fabrics letters and the dashed sewing line circle on a piece of photo fabric.  After cutting out the large “X” shape from magenta, teal and lime Equinox Fabrics and fusing those into the center of the white medallion, I and my trusty BERNINA 750QE, appliquéd stitched the large “X” in place and finished off the piece with some of my favorite decorative stitches around the medallion. I used one of my favorites which is Stitch #603 with a rainbow variegated thread from Aurifil. I love how it embellishes and texturizes the edge of the center medallion.

I next appliquéd all the letters in a circle spelling out Benartex’s Motto – Create•Inspire•Delight. Carl actually helped me with this task as he cut out all of the letters on our handy Cricut laser cutter. Once cut, I fused them in a circle and stitched a small zig zag around each letter. This took considerable time but it was well worth it! I finished off the wallhanging by adding some black buttons in between each word and binding it with that beautiful bronze gold Equinox fabric.

Voila! Now it hangs above my BERNINA in the sewing room!

Disco Dazzle Dots!

One of the fun things about being a Benartex Fabric Ambassador, is that I get to preview new fabric collections about 6 months prior to them being released. So when I saw my friend, Christa Watson’s new collection, I just knew I needed to request fabric to make a new sample with it!

Last month I finished that new sample…I made my ‘Disco’ pattern. The collection was designed by my fellow designer and friend, Christa Watson of Christa Quilts, Inc. and the new collection is called ‘Dazzle Dots’ from Benartex Fabrics. Besides polka dots being just super plain fun to stitch with, the range of colors in this new collection is fabulous, modern and super #colouricious.

I chose to make the Small Lap version of’ ‘Disco’ which measures 48″ x 60″. This version is also very fabric efficient as it needs just 14 fat quarters and 1 yard each of two background fabrics.

Even though the ‘Disco’ pattern includes a template for the L Shape and the Quadrant shapes, I chose to take my Color Girl Quilts Classic Curve Ruler out for a test drive. This is great notion for cutting curves and one ruler allows you to cut any curve and the accompanying L-Shape from 4″ up to 8-1/2″. I cut all of the quadrants and L-Shapes in lickety split time and best of all, accurately (watch the video below)!

If you’d like to purchase this nifty ruler you, can do so from Color Girl Quilts!

Then I pieced the curves following my own video tutorial, ‘Stitching Perfect Curves Made Easy’. You can view it right here. Each block went together perfectly with very little effort.

Another unique feature of the ‘Disco’ pattern and a departure from most traditional drunkard’s path block quilts is once pieced, the blocks are trimmed down leaving only a scant 1/4″ of the background fabrics at the outer edges of the block. When the blocks are pieced together, it appears as if they are touching, overlapping and connecting with one another.

After trimming the blocks down, I was ready to lay out my design. Also unique to this pattern and super fun is the changing background. It’s not just one fabric throughout the whole quilt, but two contrasting fabrics, which provide an extra layer of depth and movement behind the spinning colored disco balls.

Once the quilt top was pieced, I sent it off to Teresa Silva of Quilting of my Bliss for her to add some of her infamous magic machine quilting. She always does a beautiful job no matter if it is custom quilting or just an edge to edge pattern. Here, she did some beautiful modern free motion quilting.

All in all, this new Disco sample came out fabulous, fun and modern and showcased Christa’s new Dazzle Dots fabric collection wonderfully!

Proud to Be Named a 2024 Benartex Fabric Ambassador !

I am super excited about the New Year and what 2024 has in store!
If you haven’t yet heard, l will be part of a fantastic new team of Benartex Ambassadors for 2024! What does that mean exactly? Well, eleven of my fellow designers and I will be quilting and stitching up a storm using all sorts of fabulous fabrics and notions from Benartex and Contempo Brand Fabrics.


Here are the 12 Ambassadors (and I’ve linked to their websites so you can check them out)!

Belle Bruner / Seams Sew Me
Rachelle Craig / Rachelle HandMade
DayBrook Designs
Kena Dorsey / Kena Quilt Studio
Kaitlin Esche-Lyon / Quarter Life Leap
Sarah Fulks / Snuggle Bug Stitching
Amy Lollis / Amy Lollis Design
Kari Matthews / Prairie Quilting
Jennifer McClanahan/Sweet Tea Pattern Company
Tammy Silvers/Tamarinis
(Moi!) Linda Sullivan / Colourwerx
Amanda Whisman / Be Mandy Things

It’s going to be great fun creating new Colouwerx patterns and reimagining best sellers using the fabrics from Benartex Fabrics. Each month a set of designers will have new projects to show and tell and there will be a few group projects each quarter where all twelve of us will make something special around a certain theme. The first group projects will launch in February!

I can’t wait! Wanna see a sample of what I’ll be stitching with ? Well watch me unbox my first shipment of Benartex goodies right here:

So please be sure to follow along with me and my fellow Benartex designers this year by subscribing to our Instagram or Facebook pages! You can also follow all of the fun at Benartex Fabrics as well on their Facebook group page at Create!Inspire!Delight!

A big thank you to Benartex Fabrics for selecting me and I look forward to a fabulous year of new designs using wonderfully #colouricious fabrics!  I’m so excited to part of this fabulous team! 

Mini ModDog is Now an On Demand Class – Take it At Your Own Pace!

Had a “ruff” run with fusible web machine appliqué? Let me show how to cut the frustration and “de-fuse” the situation with my new on demand workshop – Wonky Piecing & Easy Applique Mini Mod-Dog! Get ready for this paws-itively adorable and fun project…the Mini Mod Dog and best of all, you can stay at home in your jammies and take this new workshop in the comfort of your very own sewing studio!

I created this online workshop just for you – to take at your own pace – lifetime access to all of the lessons and best of all, in partnership with Creative Spark and C&T Publishing!!

Create your own colorful pup using improv piecing and fusible web appliqué. After covering the supplies needed, I’ll guide you step-by-step as you master the basics of wonky improv fabric piecing. Next, I’ll show you unique ways to customize your Mini Mod Dog quilt with textured background blocks and my three favorite quilting patterns.

From properly preparing the appliqué shapes to finding your unique appliqué stitch, I’ll demonstrate the basics of machine appliqué. Finally, I’ll show you how your project can be turned into a fun travel-size pillow or a small wall hanging!

All of this is included and covered in detail though 9 video lessons for one low class fee which includes the Mini ModDog pattern and lifetime access to the course so you can take it at your own pace!

It’s the ultimate ‘immediate gratification’ sewing project…But be warned – making these little Mini Mod Dogs are so fun and addictive that you might find that you can’t stop at just one!  

What you will learn

  • Three fun and easy-to-stitch machine quilting patterns using just your domestic machine and a walking foot
  • The basics of fusible web machine appliqué and the notions and tools needed
  • Discovering your unique appliqué stitch, how to maneuver around curves, and create points with perfect accuracy
  • The basics of wonky improv strip piecing to be used for your dog shape
  • How to transform your project into a small pillow, a wallhanging, and so much more

How do I sign Up and register for the Wonky Piecing & Easy Applique Mini ModDog? Right below and see you in class!

REGISTER HERE!

Piecing Perfection – Here’s Your Invitation to Join the Party!

Piece together a good time with me and a few of my fellow quilting teachers!

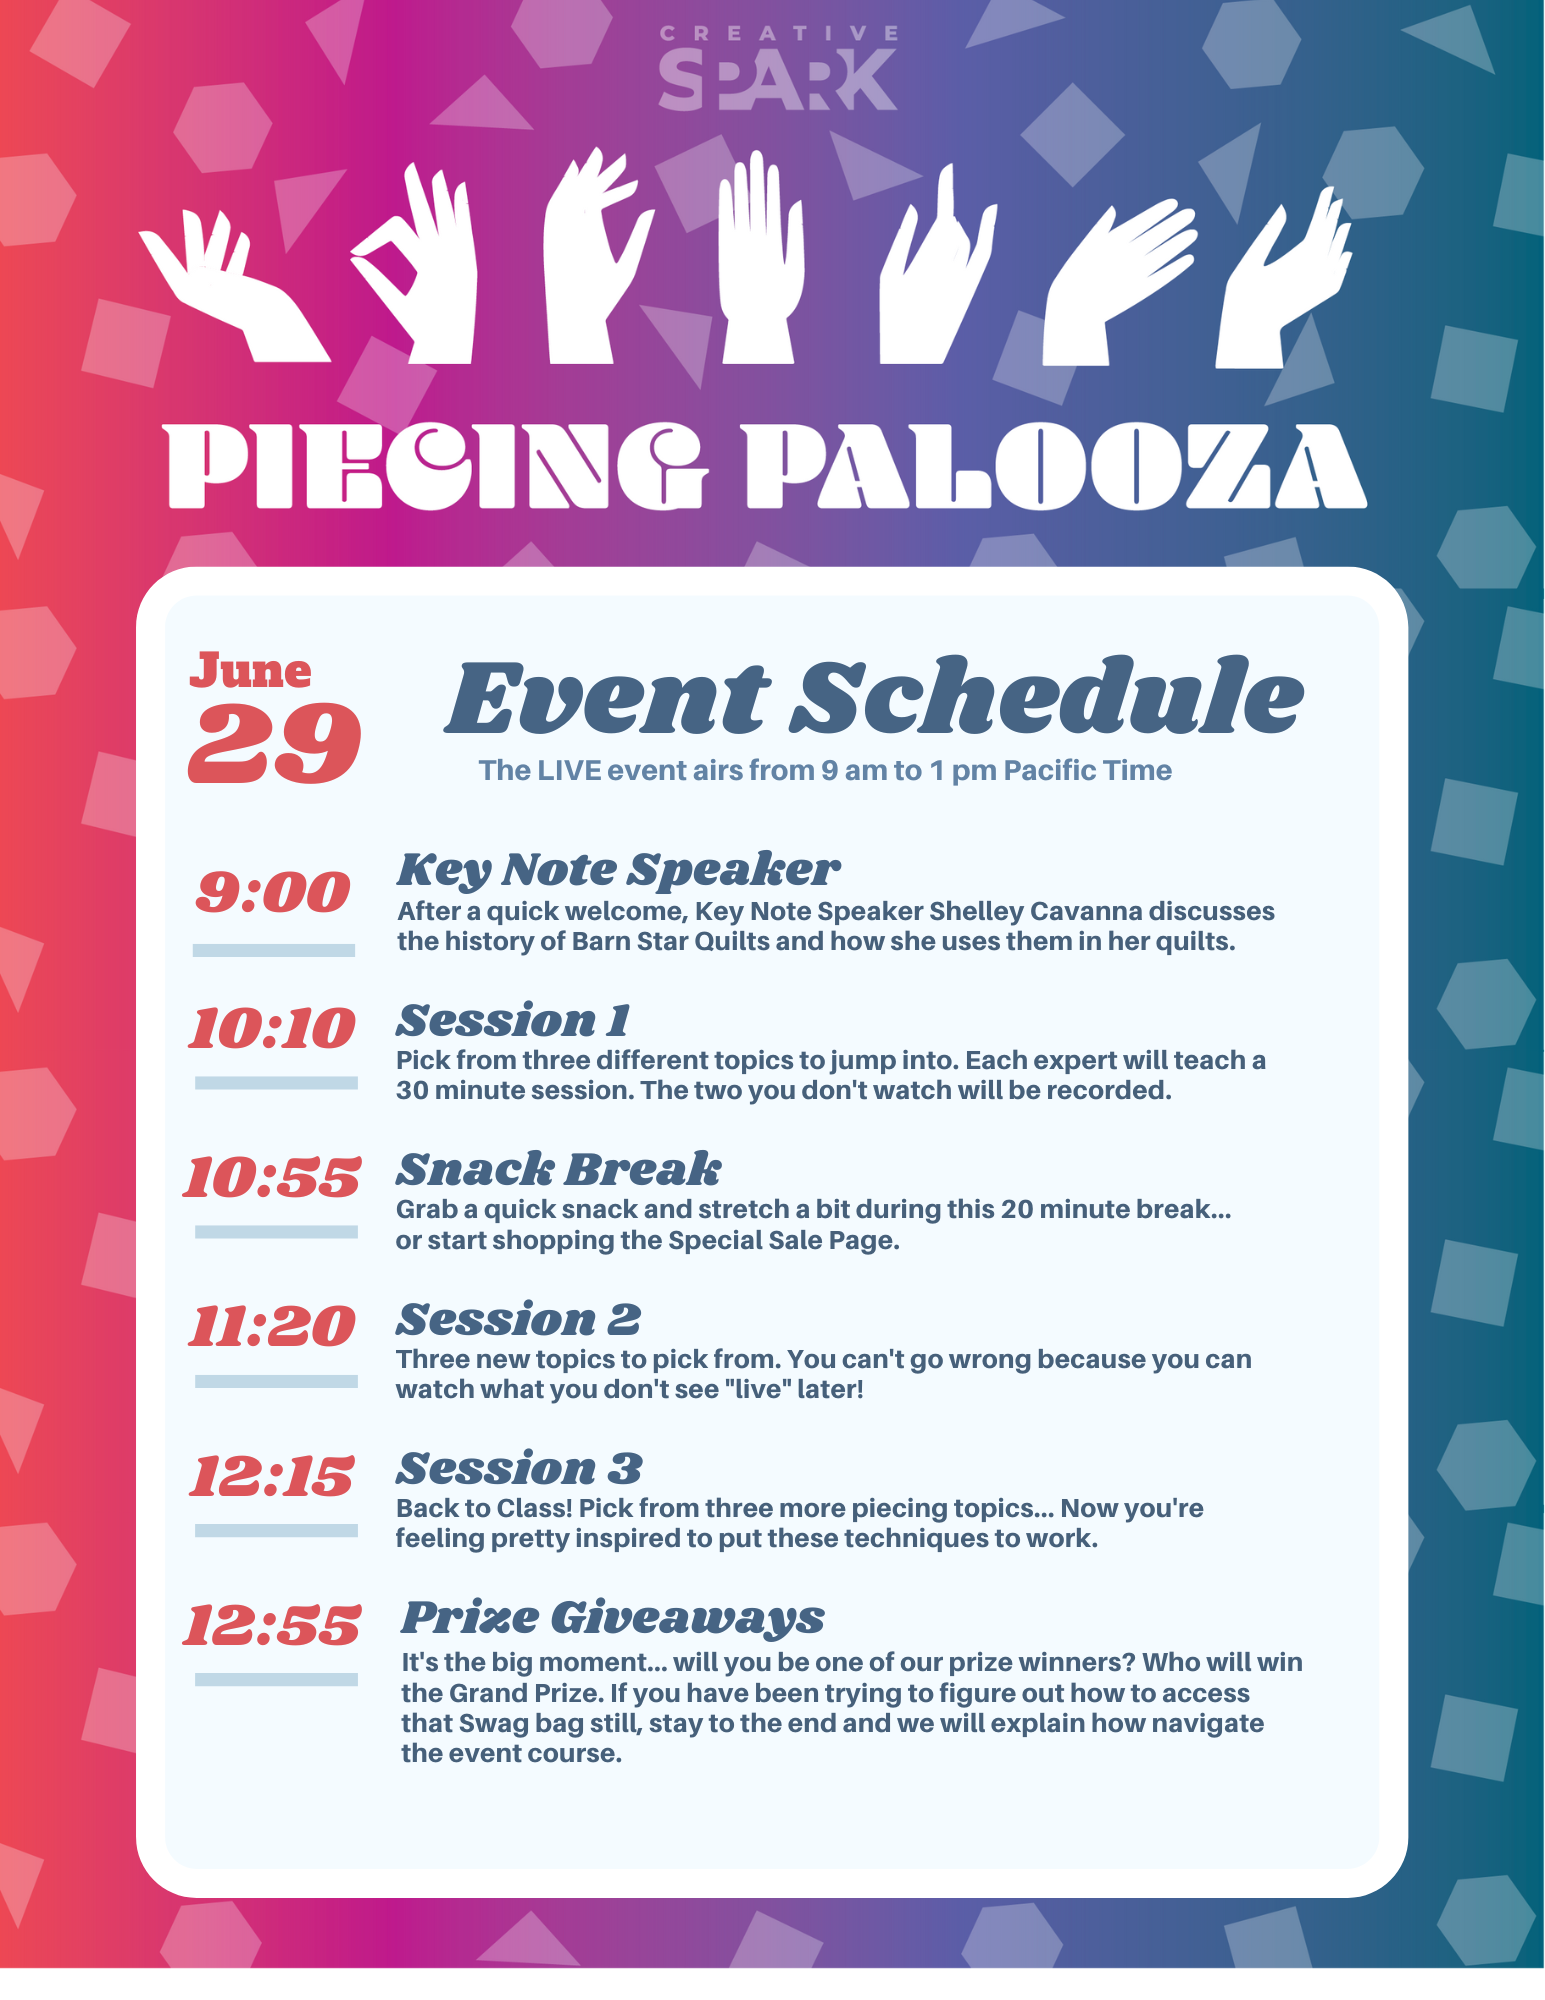
Join me on June 29th at 9 am PT for the second installment of Piecing Palooza! I’ll be demoing my best tips and tricks for perfecting your 1/4″ seam!!

Piecing Palooza is a live, virtual event for learning quilt-piecing techniques and skills taught by expert instructors on Creative Spark, an online learning platform created by C&T Publishing. Get ready for playful piecing, exciting giveaways, and inspiration to fuel all your future projects! 

Shelley Cavanna, owner of Cora’s Quilts, will be the opening keynote. Shelley has been a self-taught quilter since 2007 when she bought her first sewing machine. She has a lot of fun playing with classic quilt blocks and discovering how to use pre-cuts to make them! Shelley will set the stage for the event with her inspiring words and passion for quilting. 

Piecing Palooza 2023 Schedule

Here’s how the event works:

After Shelley’s keynote, choose your quilting adventure with workshop sessions by all of the expert instructors. In each session, you can choose from (3) 40-minute workshop options to learn various subjects, such as working with quilting technology, curved and improv piecing, modern quilt blocks, tips for accurate piecing — and so much more! Whether you’re looking for new skills and techniques, technologies to explore, or inspiration for your next project, there is something for every quilter at this event to level up your projects. 

In total, the event has(9) 40-minute workshops — all of which you have unlimited access to after the event. Those who attend the live portion of the event get entered into a HUGE giveaway. Since Creative Spark thinks everyone is a winner (and so do we here at Colourwerx), everyone gets a virtual swag bag with goodies like patterns, coupons, and so much more!

Talk about a treasure trove of resources! With nine lessons to refer to over and over again, you’ll be well on your way to becoming a master of piecing! *Cue the compliments from quilting friends impressed with your leveled-up skills* :-).

Check out the fabulous list of wonderful instructors: 

  • Keynote: Community Threads (Shelley Cavanna)
  • Piece Easy (Belle Brunner)
  • Improv Slabs- Using Fabric Scarps to Make Fabric (Cheryl Arkison)
  • Making Your Quilting Dreams a Reality: Designing in Electric Quilt 8 (Jenny Novinsky & Janice Frisch)
  • Three Ways to Fabric Foundation Piecing (Julia McLeod)
  • Tips & Tricks to Perfect Your ¼” Seam (Linda Sullivan)
  • Curvy Blocks (Lynn Rinehart)
  • Frustration-Free Sewing (Marci Baker)
  • Pinewheelers–Fun with Pieced Strips (Maria Shell)
  • Freezer Paper Magic – Meet Your Next Foundation Piecing Obsession (Rebecca Bryan)

So come unleash your inner quilter at our colorful event with expert instructors! Spots are limited, so sign up now and save $20 off enrollment with this link!

See ya there! Until your next color fix~ L&C

ModBlossom QAL-Week 5: Putting It All Together!

Welcome back to the last week of our ModBlossom QuiltAlong! This week is all about putting it together so whether you’ve just made a few blocks or all (12) blocks – I’ve got some different layouts to share with you.

There’s no companion video to share with you this week as the pictures below kinda say it all! So let’s get started!

Now that you’ve made Flower & Leaf Blocks it’s time to put them together. You’ll note that the pattern does not call for any sashing strips in between blocks but if you’d like to add one – absolutely, it’s your quilt and you can do what you want 🙂 – it will make the blocks “float”.

If you’ve made (6) of each block or a total of (12) – you’ll of course have way more layout options, but I’ve given you some ideas below if you’ve only made two or three of each so let’s take a look! Please note that these pictures DO NOT have the outer border – of course once you decide your layout add 3″-4″ outer border strips on all four sides of your quilt top which will again make the blocks appear to ‘float’ in the background.

Layout #1 – A Small Baby Quilt (6 blocks) – this will measure 36″ x 54″ without borders

Not pictured – you could also just place (4) blocks together in a four patch and have a nice sized baby quilt as well measuring 36″ x 36″ without borders.

Layout #2 – A Small Lap Quilt (9 blocks) – this will measure 54″ x 54″ without a border

Layout #3 – Large Lap Quilt (12 blocks) – this is the pattern cover quilt and will measure 54″ x 72″ without borders

Layout #4 – Large Lap Quilt “On Point”

Lay out the blocks “on point” – I love this version and just wished I had planned this out more to make additional blocks in other color ways – To fill in the side triangles, from your background fabrics, cut 19″ x 19″ squares – cut each background square in half diagonally to create 2 triangles; and then stitch the triangles on to the beginning and end of each diagonal row! Looks complicated but it’s not!

You could use this “on point” layout even if you made fewer blocks!

Layout #5 – Table Runner (5-8 blocks)

This will measure 18″ x (x)” without a border pending how long you want your table runner.

Of course you can also make large throw pillows from each block. I would plan on adding a small outer border and use a 24″ pillow form so the actual block is showing on the front of the pillow and is not being wrapped around the edges of the pillow form.

So whatever way you choose to layout your completed ModBlossom blocks – I hope you’ll share a few pictures with Carl and I of your finished creations! Thanks so much for stitching along with me!

This concludes out ModBlossom QuiltAlong – I hope you enjoyed it!

mouth21

Look for more Colourwerx QuiltAlongs on our Colourwerx Facebook page or on our website under QuiltAlongs!

Until your next colour fix – happy quilting!  Linda & Carl xxoo

ModBlossom QAL-Week 4: Make the Flower Block

Welcome back to another fun week of making beautiful bodacious blossom blocks! This is Week #4 of the ModBlossom QuiltAlong and this week is all about making the Flower Block! I think you’ll find this week’s block goes together much faster than its counterpart: the Leaf Block from Week #3!

Here’s this week’s companion video. You’ll also want to follow along with the diagrams and steps in the ModBlossom pattern – you’ll find those on pages 8-12.

GATHER THE FLOWER BLOCK PIECES:
To make just (1) FLOWER BLOCK you will need the following units:
• (4) Template A (2 cut from each of your (2) coordinating fat quarters);
• (4) Background Fabric Template B Shapes;
• (2) 6″ squares (1 cut from each of your (2) coordinating fat quarters);
• (2) Background Fabric 6″ squares;
• (4) 3″ squares & (4) 1-1/2″ Flower Center squares;
• (4) 3-1/2″ Flower Cornerstone Squares (2 cut from each of your (2) coordinating cornerstone fabrics);
• (4) Background Fabric 2-3/4″ squares;
• (4) Background Fabric 2-3/4″ x 5″ strips

STEP ONE – Make Half Square Triangles:
We’ll be making half square triangle units (HST) from our 6″ squares and our 3-1/2″ Cornerstone squares.

1. Start by pairing up (1) 6″ Background Square to (1) 6″ colored square – make 2 pairs. Also pair up the 3-1/2″ Flower Cornerstone squares with one fabric color to the other in each pair – create (2) pairs.

2. Draw a diagonal line down the Wrong side of the lighter square in each pair.

3. Matching the pairs Right Sides Together, stitch a 1/4″ seam down both sides of that drawn diagonal line.

4. Cut each pair of squares apart on the line and press to the darker fabric.

5. Trim down and square up the HST units as follows:
— Flower 6″ HST – trim down to 5″ – make a total of (4);
— Cornerstone HST – trim down to 2-3/4″ – make a total of (4)

STEP TWO – Make the Cornerstone Units:
1. Gather the (4) 2-3/4″ HST Cornerstone units created above, the (4) Background 2-3/4″ squares and the (4) Background 2-3/4″ x 5″ strips.

2. Following the instructions and diagrams in the pattern on page 9, stitch the 2-3/4″ Flower Cornerstone HST to one 2-3/4″ Background square.

3. To complete the unit, stitch the 2-3/4″ x 5″ Background strips to the top edge. The unit should now measure 5″ x 5″. Make (4) units EXACTLY ALIKE taking note of the orientation of the Cornerstone HST. Trim and square the units if necessary.

STEP THREE – Stitch Template A to Template B:
1. Gather the (4) Template A and the (4) Background Template B.

2. Following the instructions and diagrams in the pattern on page 10, line up the notched ends of template B even to the edges of template A – pin in place – and stitch down the diagonal edge.

3. The unit should now measure 9-1/2″ x 5″. Make (4) units EXACTLY ALIKE. Trim and square the units if necessary.

STEP FOUR – Create the Flower Block & Snowball the Center:
1. Following the diagrams in the pattern on page 11, lay out the (4) template A/B units, (4) HST units and (4) 5″ Cornerstone units.

2. Sew each quadrant together .

3. The quadrant should now measure 9-1/2″ x 9-1/2″. Make (4) units. Trim and square the units if necessary.

4. Select the (4) 3″ Flower Center Squares and draw a diagonal line on the wrong side of each square. Do the same to the (4) 1-1/2″ squares for the inner Flower Center squares.

3. Following the diagram on page 11-12 pin a 3″ Flower center square in the center corner of each Flower Unit. Make sure the diagonal line is orientated the right way – refer to the pattern.

4. To ‘snowball the corner’ – stitch on that line – BUT HERE’S A TIP: I like to stitch just a hair to the right side of that line. That way when you flip and press that corner over to center, the tip will match the center corner exactly. If you stitch right on the line, you’ll find that thread and the fabric folding over take up precious seam allowance and the tip of the 3″ square will never meet or match the center corner of the Flower unit. By stitching just a hair over to the right of that drawn line, you’ll ensure that it will.

5. Once you have pressed the 3″ square over to meet the center edge of the Flower Unit, trim away excess fabric layers below leaving a 1/4″ seam allowance. Repeat the above on all (4) Flower units.

6. Repeat the above steps with the 1-1/2″ Flower Center Inner squares – snowballing each to the center corner of the Flower Units. Repress the snowballed seams of (2) opposing Flower blocks in the opposite direction so the center seams will nest nicely.

7. To finish your block stitch the units together to form 2 rows and then stitch the rows together to create the block. When complete the block should measure 18-1/2″ x 18-1/2″.

That’s it for Week 4 and wow! we are almost complete! Next week is our last week – in Week 5, we’ll put it all together ! So go forth and make more Leaf and Flower Blocks!

Feel free to ask questions, share your progress and of course, post pictures over in the Colourwerx QuiltAlong Facebook Group – here’s the link just in case:

COLOURWERX QUILTALONG FACEBOOK GROUP HERE

Until our final week together, happy #colouricious quilting!

xxoo Linda & Carl

ModBlossom QAL – Week 3: Make the Leaf Block

Welcome back to the ModBlossom QAL !! This is Week 3 already and this week we’ll be making these gorgeous huge Leaf Blocks!

Here’s this week’s companion video and again I can honestly say, I think the video shows you a lot more tips and tricks than what you’ll probably get by reading this post. You’ll also want to follow along with the diagrams and steps in the ModBlossom pattern – you’ll find those on pages 5-8.

GATHER THE LEAF BLOCK PIECES:
To make just (1) Leaf block you will need the following units:
• (8) Background Fabric Template C (L shapes);
• (4) total Leaf Fabric 10-1/4″ squares (2 each of 2 fabrics);
• (4) total Leaf Center 4-3/4″ squares (2 each of 2 fabrics)
• Template D Shape

STEP ONE – MAKE HALF SQUARE TRIANGLES:
We’ll be making half square triangle units (HST) from both our 10-1/4″ squares and our 4-3/4″ squares. 1. Start by pairing up the same size squares together with one fabric color to the other in each pair – you’ll create (2) pairs for each size.

2. Draw a diagonal line down the Wrong side of the lighter square in each pair.

3. Matching the pairs Right Sides Together, stitch a 1/4″ seam down both sides of that drawn diagonal line.

4. Cut each pair of squares apart on the line and press to the darker fabric.

5. Trim down and square up the HST units as follows:
— Leaf Fabric HST – trim down to 9-1/2″ – make a total of (4);
— Leaf Center HST – trim down to 4″ – make a total of (4)

STEP TWO – CUT OUT TEMPLATE D
1. Gather template D and the (4) 9-1/2″ Leaf HST units. Lay Template D along the diagonal line of one Leaf HST unit matching tip to tip. Trace with a washable marker, the curved edge of Template D onto the RIGHT side of first HST unit. Also transfer and copy the markings onto the Right side as well – there will be 6 markings: three on each side – one in center and one to the left and right of that center mark. These markings will guide your placement of the L Shape (Template C) in the next step.

2. Cut out the curve on both sides of the Leaf HST. Use scissors if you are not confident using your rotary cutter to avoid a mishap – eek!

3. Repeat the above steps on all (4) Leaf HST units.

STEP THREE – ATTACH AND STITCH ON THE L SHAPE (Template C)
1. Select (2) L Shapes and (1) Curved Leaf unit. Press the L shape in half to crease a center mark for yourself.

2. Align (1) L Shape Right Sides Together with the Leaf Unit – matching the center marks; pin in place. Next take the end of the L shape and align it to the mark on the left; pin in place. Do the the same with the remaining L Shape end on the right side of center. You may pin more but I find these 3 pins work fine when stitching the L Shape to the Leaf Unit. Repeat on the opposite side of the Leaf Unit.

3. Maintaining your “best” 1/4″ seam, stitch the L Shape on the Leaf Unit. Do not remove the three pins if at all possible. It is important for the L shape to begin and finish on the hashmarks you transferred from Template D. The video tutorial shows me stitching this curve in real time for you with some helpful tips and tricks – and the patterns also has helpful tips on page 6.

4. Once both L Shapes are stitched to the Leaf Unit, press the seams out toward the L Shape Background fabric. Repeat the above steps on the remaining Leaf units and L Shapes to create a total of these (4) units.

5. Place (1) Leaf unit on the cutting board and trim the to 9-1/2″ x 9-1/2″. You will find that most of the outer corners of the L Shape will be trimmed away. Do this same step to all (4) Leaf units.

STEP FOUR – SNOWBALL THE CENTERS (OR CHOOSE NOT)
1. Lay out the 4 Leaf units in formation on your cutting mat.

2. Select the (4) Leaf Center 4″ HST units you created above and draw a diagonal line on the wrong side of each unit in the OPPOSITE DIRECTION of the seam line.

3. Following the diagram pin a 4″ HST unit in in the center corner of each Leaf Unit.

4. To ‘snowball the corner’ – stitch on that line – BUT HERE’S A TIP: I like to stitch just a hair to the right side of that line. That way when I flip and press that corner over to center, the tip will match my center corner exactly. if you stitch right on the line, you’ll find that thread and the fabric folding over take up precious seam allowance and the tip of the 4″ HST unit will never meet or match the center corner of the Leaf HST. By stitching just a hair over to the right of that drawn line, you’ll ensure that it will.

5. Once you have pressed the Center HST over to meet the center edge of the Leaf Unit, trim away excess fabric layers below leaving a 1/4″ seam allowance. Repeat the above on all (4) Leaf units.

To snowball the center corners of the Leaf units or not to – is entirely up to you. Notice on the pattern that some Leaf blocks have a double pinwheel center(far left photo below and what we learned above) and some have a single pinwheel (center photo below and created like above but just using (4) 3″ squares) and some do not have any snowball center at all (far right photo below).

Check out page 8 in the pattern for more info on this and diagrams.

STEP FIVE – ASSEMBLE THE LEAF BLOCK
1. Once the centers of each Leaf unit have been snowballed (or not), place the 4 blocks in formation. Stitch the units together to form 2 rows and then stitch the rows together to create the block. When complete the block should measure 18-1/2″ x 18-1/2″.

That’s it for Week 3! Week 4 will construct and stitch together that beautiful Flower Block!

Feel free to ask questions, share your progress and of course, post pictures over in the Colourwerx QuiltAlong Facebook Group – here’s the link just in case:

COLOURWERX QUILTALONG FACEBOOK GROUP HERE

Until Week #4, happy #colouricious quilting!

xxoo Linda & Carl

ModBlossom QAL – Week 2 : Make the Templates and Cut Your Fabric

Welcome back! Today we start Week #2 of the ModBlossom QAL ! This week is all about making the template shapes and cutting your fabrics.

But first – if you’re just joining us, there’s still time to hop in!
Here’s what you’ll need to join in on the stitchin’ fun –
• The ModBlossom Pattern! You can purchase it in either paper or PDF formats buy clicking the links below….

Purchase the ModBlossom Paper Pattern here!

Purchase the ModBlossom PDF Pattern here!

WHAT YOU MAKE DETERMINES HOW MUCH FABRIC YOU WILL NEED
Now you need to decide what you want to make while you join me in stitching up these fun blocks over the next few weeks….here’s two options to choose from:

THE LAP QUILT: (which finishes at 62″ x 80″) is fat quarter friendly so all you need is a fat quarter bundle with at least (18) fat quarters plus background yardage of 3 yards.

I Want to Make Just a Block or Two – If you’re unsure and just want to ‘dip your toes in’, making just a block or two of each leaf and flower version is a great fun, and you can always turn these large 18″ x 18″ blocks into pillows or a table runner when complete.

For just making a block or two – you’ll need to gather 6 fat quarters plus about 1/2 yard background yardage.

It’s time to start! Here’s this week’s companion video and I can honestly say, I think the video shows you a lot more tips and tricks for cutting than what you’ll probably get by reading this post:

Step One – Make the Template Shapes
Depending upon which format you bought the pattern in, (whether that be a paper pattern or an electronic PDF download) you’ll need to trace and cut out these template shapes to make each of the blocks we will be working on.

Paper Pattern: Find the Pattern Insert and unfold. Then just trace the shapes onto template plastic or heavy card board and cut out.

SIDENOTE: Sometimes I like to make a copy of all of the pattern shapes – you can do this at Staples or an Office Depot.Then I use an adhesive spray (like 505 or a Photo Spray). I spray the adhesive on cardboard or a file folder- fuse my paper copies to the cardboard and then cut the shapes out.

PDF Pattern: If you bought the PDF pattern, print out the last 4 pages of the pattern. Make sure your printer is set to 100%. Check the scale ruler on each pattern page for accuracy and adjust your print settings if needed. Then tape together where indicated the (2) shapes that make Template D. To complete your templates, either cut out each shape or trace the shapes onto template plastic or heavy card board and cut out. Or print extra copies and adhere as explained above to heavy cardboard using spray adhesive.

Regardless, once complete, you should have four template shapes prepared: Templates, A, B, C & D.

Step Two – Assign Duties to the Fat Quarters & Cut
If you’re making the Lap Quilt which requires (18) Fat Quarters + 3 yards Background, you’ll probably want to follow the cutting directions in the pattern on pages 1-4.

The cutting directions below assume you are making (1) Leaf Block and (1) Flower Block. However, if you want to make more blocks during the quiltalong just repeat the below (x) the desired number of blocks you want to make.

First, let’s assign our Fat Quarters their duties. Last week, I mentioned that you’ll want to pair up coordinating fat quarters. These pairs will either make flower/leaf petals, OR be the centers of the blocks OR be the cornerstones in the Flower Block. See the diagram below.

I’m stitching right along side you so here is how I paired my ‘Stitchy’ Fabric (designed by Christa Watson at christaquilts.com). I added the extra pair of orange Fat Quarters as I am making extra blocks.

Remember anything goes here and there is no right or wrong pairing so if it looks good to your eye, then its good to go!

Lap Quilt – If you’re making the Lap Quilt follow the diagram below to help you divide up the 18 fat quarters into pairs. Notice that a few pairings are only making either (1) Leaf Block or (1) Flower Block (and not both) and the remaining fabric will be used for Flower Centers or even Leaf Centers.

Step Three – Cut the Fat Quarters
1. Cut Pair #1 – Flower/Leaf Block Fat QuartersEach Fat Quarter that is assigned to make Flower & Leaf Blocks is cut exactly the same.

First make sure the Fat Quarter is a FULL 18″ x 21″. Lay the FQ on the cutting board with the 21″ side running vertically and the 18″ side running horizontally. Also gather template Shape A. Keeping the pairs together: cut the following from EACH Fat Quarter:

2. Cut The Background Yardage – this is assuming you are making just (1) Leaf Block and (1) Flower Block: – also gather Template Shapes B & C. Refer to the pattern on how to lay the Template Shapes on to the fabric strips and to cut the templates out of the fabric. Remember to cut Template B with the strip UNFOLDED!

3. Cut the Remaining Pairs of Fat Quarters – These are for the Flower centers, Leaf Centers & Flower Cornerstones so you could use scraps too!

That’s it – all cutting is complete and we are ready to go!! Next week for Week #3 we’ll dive right in and start stitching the Leaf Block. Also feel free to ask questions, share your progress and of course, post pictures over in the Colourwerx QuiltAlong Facebook Group – here’s the link just in case:

COLOURWERX QUILTALONG FACEBOOK GROUP HERE

Until Week #3, happy #colouricious quilting!

xxoo Linda & Carl