ModBox QAL – Week #1 – Get Your Pattern and Gather Your Materials

Hello!  And welcome to the ‘first week’ of our eighth Colourwerx QAL (quilt along) where we’ll be making the bold and graphic super fabulous and oh – so – easy “ModBox”. This is a super fun quilt to make, and it’s a great project for half yards, fat quarters or even fat eighths (depending upon which size you make).

JOIN THE COLOURWERX FACEBOOK GROUP: First, I want to thank you so much for joining us here.   If you want to meet with other Colourwerx quilty friends and aren’t yet a member of our Facebook group, I  invite you to join our free QAL Facebook group where you can ask questions, share your progress and of course, post pictures of your finished projects so everyone can share in the fun!  Also feel free to share this invite and any other QAL news with quilty buddies and invite them to join along in the fun!

JOIN THE COLOURWERX QUILTALONG FACEBOOK GROUP HERE

COMPANION VIDEOS: Each week of the quiltalong, also look for a companion video to be posted within the blog post like this one below.   If you’d like to receive alerts to when the videos are posted and other neat tutorials and replays of our Fab Friday Live broadcasts, then subscribe to our Colourwerx YouTube channel right here!

If you’d like to view this week’s companion video to Week #1 of the ModBox QAL, view it here:

So this is Week#1 of the ModBox QAL – 
First let’s review our super fast 4-week schedule!
• Week 1 (this week) we’ll gather our pattern and our fabrics together…
• Week 2 is all about deciding the color order and precutting your fabrics….
• Week 3 is all about piecing the blocks….
• …and Week 4 we’ll be putting it all together.

Super fun!!

Week #1 – GATHER YOUR PATTERN & MATERIALS —
Here’s what you’ll need to join in on the stitchin’ fun –

• The ModBox Pattern! You can purchase it in either paper or PDF formats buy clicking the links below….

Purchase the ModBox Paper Pattern here!

Purchase the ModBox PDF Pattern here!

WHICH SIZE WILL YOU MAKE??
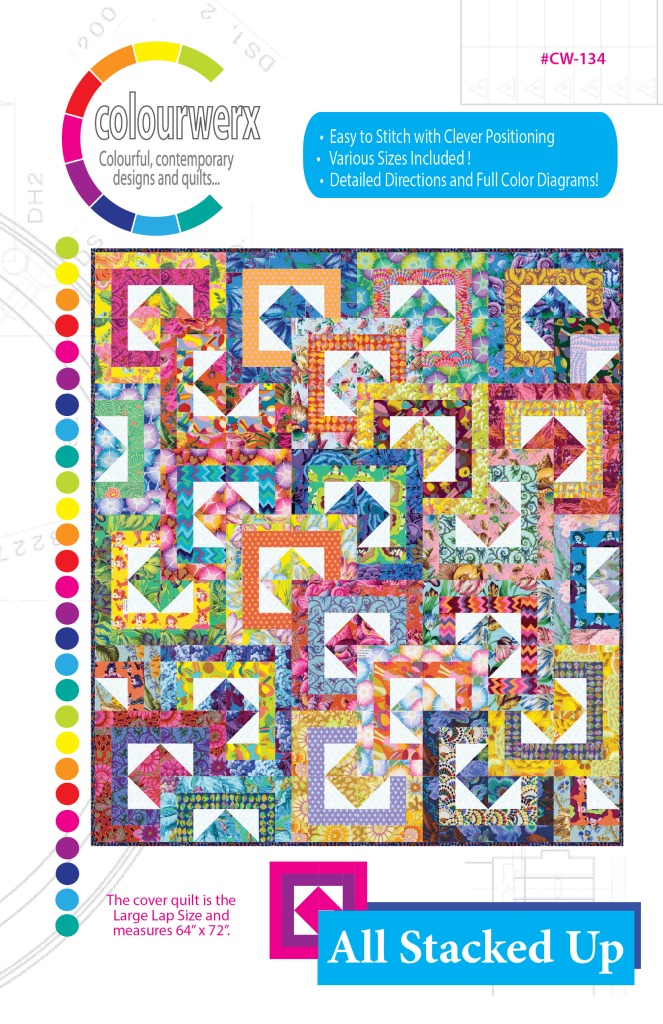
Once you get the pattern home, check out the back cover and determine which size ModBox you’d like to make. There are three versions to choose from:

  1. The Large Lap Size – measures 72″ x 84″ and requires (10) half yards (or 20 Fat Quarters) plus (2) background fabrics – 1 yard and 1-1/4 yards each;

The Baby Size quilt – measures 36″ x 45″ and requires (18) Fat Eighths (or 9 Fat Quarters) plus (2) background fabrics – 1/2 yard each fabric.

  • The Table Runner Size – measures 18″ x 63″ and requires (13) Fat Eighths (or 7 Fat Quarters) plus (2) background fabrics – 1/2 yard each fabric.

DIFFERENT VERSIONS
Let’s look at some different versions of the ModBox quilt that we’ve either made or rendered for different fabric companies in a variety of color motifs. This may give you an idea of what colors you might want to use for your ModBox Quilt. Click the arrows to view each version.

WHAT FABRICS AM I USING??
I always like to stitch up a new sample along side you while we do QuiltAlongs and this time, will be no exception. I’ll be making the Large Lap version out of the Kaffe Fassett Collective February 2021 fabrics that just arrived into shops! Here’s a rendering of the quilt we made up in Electric Quilt Software 8.

And here’s a close up of the gorgeous new Kaffe Fassett Collective fabrics – I just love these hot tropical colors and patterns in this new collection: fucshias, magentas, peachy oranges and deep burnt apricot!

My background fabrics will be these two deep dark plum fabrics and the binding will be my new fave Kaffe Fassett fabric – this fiery orange button fabric! I think it’s going to be really spectacular!

So go forth and choose fabrics and be sure to get your ModBox pattern from the Colourwerx Shop! Once your fabrics are selected, you might want to start thinking about the order for your fabrics. We’ll talk more about this next week in Week #2!

That’s it for Week #1 – that was fun! And I can’t wait to see all of your fabric selections! Week #2 we’ll decide fabric and color orders and then precut all of our fabric !

Until then, please be sure to email us at colourwerx@yahoo.com if you have any questions.  Or feel free to post questions or progress pictures on our Colourwerx QAL Facebook Group.

Until your next colour fix and next week’s QAL post ~  happy and bright quilting always!   

L&C xxoo

All Stacked Up QuiltAlong: Week 2 – Piece the Blocks

Hello!  And welcome to the second week of our super fast and fun new quiltalong: All Stacked Up.

This week is all about piecing the fun All Stacked Up quilt block. By now you should have your fabrics selected and precut according to pages 1 -2 in the All Stacked Up pattern. You should also have a fairly good idea about which fabrics will be paired together. If you are just joining us this week, please refer back to Week #1’s All Stacked Up QAL blog Post right here.

COMPANION VIDEO
Each week of the quiltalong, I always post a companion video and this week is no exception….If you’d like to view this week’s companion video to Week #2 of the All Stacked Up QAL, view it here:

Set Your Machine Up for Success —
Before we start the piecing fun, I always think it a good idea to set your sewing machine up for stitching success.

Here are few things I always do when starting a new project that requires precision piecing:
• Lift the stitchplate and clean out all of those dust bunnies;
• Change the needle to a new needle – I prefer the Schmetz 75/11 Quilting Needles for precision piecing;
• Thread your machine with a neutral colored 100% cotton , 50 weight thread – my go-to color and thread is #2615 from Aurifil Thread;

• And most importantly, have a good idea of how to stitch a scant 1/4″ seam…

What’s a Scant 1/4″ Seam You Say?? —
A scant 1/4″ seam is a hair less than a full 1/4″ seam.

Many machine manufactuers 1/4″ presser feet are FULL 1/4″ seams . In order to sew accurate 1/4″ seams and have our precision pieced blocks turn out to exactly the finished size they need to, we need to stitch scant 1/4″ seams.

If you’ve ever been frustrated by achieving the perfect seam allowance for quilting then I think I have the perfect little tool for you….it’s the Perkins Perfect Piecing Seam Guide and it works like a dream.

Available at most quilt shops and through Amazon, this little ruler is genius! It is quite simple – it has a hole in the middle and a line that runs end to end of the ruler and through the middle of the hole. The line designates a scant 1/4″ seam allowance.

You place the ruler under your presser foot, drop your needle down into the hole and lower your presser foot on to the ruler. You can now clearly see where you need to line up the fabric edge of your units to achieve a scant 1/4″ seam. Look closely!! – more than likely, it will not be lined up with the edge of your 1/4″ presser foot, but rather just under the edge of the foot and a little bit to the left. Once you study this, you can run a piece of painter’s tape or washi tape along the edge of the Perkins Piecing Guide to mark the stitch plate of your machine for scant 1/4″ precision perfect seam piecing! You are ready to go !

Just a Final Thought on Fabric Pairings —
I know the All Stacked Up pattern says that once you pair fabrics together, they should remain paired together through block piecing, etc….etc…etc…

But really, do they?? Once all of your fabrics are precut and paired up, you do have one final opportunity before piecing to mix up or revise your fabric pairings.

Here’s an example: my first pairing for these fabrics was mixing the green (Fabric A) with the yellow (Fabric B).

But after looking at all of my fabrics, I decided I wanted to mix up the pairings. Now I know from reading the pattern on page 3, that I need (X) amount of units in Fabric A paired with (X) amount of units in Fabric B to make (3) identical blocks. So looking at the pairing on the right side if I wanted to trade out my smaller green Fabric A units for let’s say some smaller lime green Fabric A units, I could! I can mix and match all day – as long as I have the total units for Fabric A and the total units for Fabric B paired in each grouping as specified on page 3 of the pattern.

Let’s take another look at fabric pairings…..here are my first pairings. You can see I’ve got magenta with yellow, green with orange, blue with salmon and so on….

After I precut my fabrics, I revised some of my combinations to create a more color wheel order for the quilt blocks and ended up with these fabric pairings that I like a lot better. In the end, none of my original pairs stayed together and in fact each pair is a completely different combination of fabrics than the other.

So yes, before you start piecing, take a moment to review your fabric pairings ….if you want to switch fabrics from pairing to pairing, heck yes – go ahead ! Just double check that you have the total units needed in the final pairings to make 3 identical blocks.

Piecing the Block —
Referring to the directions in the All Stacked Up pattern on pages 3-4, start by making half square triangles. Add (2) Background Fabric squares to each fabric pairing. Place the square Background Fabrics with the square Fabric A units and make Half Square Triangles – (4) squares in will yield (4) half square triangles out.

Use your square ruler and line up the diagonal line of the ruler on top of the diagonal line of the half square triangle unit to trim and square down each square to the appropriate size.

Discard (1) of the units as you will only need (3) half square triangles for the project.

Piecing the block couldn’t be more simple and chain piecing the (3) individual blocks makes this step go even faster! So go forth and piece all of your fabric pairing to create (3) identical blocks from each fabric pairing following the instructions on pages 3-4 in the All Stacked Up pattern!

That is it for Week #2! I’ll be back next week for Week #3 – our final week- where we’ll be piecing the quilt top together!

Thank you for following along and until then, happy colouricious quilting! L&C xxoo

All Stacked Up QuiltAlong: Week 1 – Gather and Pair Up Fabrics and Precut

Hello!  And welcome to the ‘first week’ of our seventh Colourwerx QAL (quilt along) where we’ll be making our super fabulous and oh – so – easy “All Stacked Up”. This is a super fun quilt to make, is a great stash buster and is also very easy to piece. It’s a great way to start the new year!

JOIN THE COLOURWERX FACEBOOK GROUP: First, I want to thank you so much for joining us here.   If you want to meet with other Colourwerx quilty friends and aren’t yet a member of our Facebook group, I  invite you to join our free QAL Facebook group where you can ask questions, share your progress and of course, post pictures of your finished projects so everyone can share in the fun!  Also feel free to share this invite and any other QAL news with quilty buddies and invite them to join along in the fun!

JOIN THE COLOURWERX QUILTALONG FACEBOOK GROUP HERE

COMPANION VIDEOS: Each week of the quiltalong, also look for a companion video to be posted within the blog post like this one below.   If you’d like to receive alerts to when the videos are posted and other neat tutorials and replays of our Fab Friday Live broadcasts, then subscribe to our Colourwerx YouTube channel right here!

If you’d like to view this week’s companion video to Week #1 of the All Stacked Up QAL, view it here:

So this is Week#1 of the All Stacked Up QAL – 
First let’s review our super fast 3-week schedule!
• Week 1 (this week) we’ll gather our fabrics and precut…..
• Week 2 is all about piecing the blocks…..
• And Week 3 we’ll be putting it all together.

Week #1 – GATHER YOUR PATTERN & MATERIALS —
Here’s what you’ll need to join in on the stitchin’ fun –

• The All Stacked Up Pattern!

Purchase the All Stacked Up Paper Pattern here!
Purchase the All Stacked Up PDF Pattern here!

WHICH SIZE WILL YOU MAKE??
Once you get the pattern home, check out the back cover and determine which size All Stacked Up you’d like to make. There are five sizes to choose from: Baby through King Size. You’ll also see on the back cover under each size the number of fabrics you’ll need to gather – look under the row heading “Block Fabrics”.

I’ll be making the Baby Size quilt along with you, so if you look under the Baby Size for example, it says for the Baby Size needs a total of (12) Block Fabrics – 1/3 yard cuts of each fabric (or 12″ x WOF).

Now you can also use Fat Quarters or 6″ Design Strips instead of the 1/3 yard cuts. You’ll need the same amount of fabrics listed under the row heading “Block Fabrics”. So for example, the Baby Size version requires (12) fabrics so you would need either (12) Fat Quarters or (12) 6″ x WOF design strips. (Take note!! The pattern does not provide a cutting diagram for Fat Quarters or 6″ Design Strips so if you do use them instead of 1/3 yard cuts, just plan out on paper ahead of cutting the total units that need to be cut (found under the “If using 1/3 yard cuts” on page 1-2) before you cut your fabric!)

Another option is to make a scrappy version (like you see here and like what is pictured on the front cover). This is the ultimate stash buster! Refer again to the back cover of the pattern and look under the paragraph: “For a More Scrappy Look”. In a nutshell – simply select which size quilt you’d like to make, then look to how many fabrics you will need to gather under “Block Fabrics” and then double the number. Taking the example of the Baby Size again, if I wanted to make a scrappy version, I see that (12) fabrics are needed….I would double that number and need to gather (24) fabrics total, in 1/4 yard and 1/8 yard cuts. I would gather (12) 1/4 yard cuts and (12) 1/8 yard cuts.

HOW MANY BLOCKS WILL EACH FABRIC COMBINATION MAKE ??
The All Stacked Up quilt is based on pairing up fabrics and each pair of fabrics will yield 1-2 ‘blocks.’ For clarification, each ‘block’ is comprised of (3) smaller identical quadrants.

If you are using 1/3 yard cuts, Fat Quarters or 6″ Design Strips, each pair of fabrics will yield (2) complete ‘blocks’ – one ‘block’ will be the mirrored image of the other.

If you are using 1/4 yard and 1/8 yard cuts (for a more scrappy look), one 1/4 yard cut plus 1/8 yard cut pairing will yield only (1) ‘block’ or (3) identical quadrants – hence why you need to double the fabrics listed for a more scrappy look.

PLAN COLOR PLACEMENT —
If you’d like to preplan color placement, you can download the Small Lap or Large Lap black & white line art diagrams from the links below.

Sometimes this really helps with color placement and also pairing of fabrics. I’ll be using a beautiful new collection of fat quarters from a new fabric collection called “Favorite Things” designed by our friend, Shayla Wolf of Sassafras Lane Designs.

Here’s an example of my colored-in Baby Size diagram using the fabrics above. I just mimicked the fabric colors and colored in the diagram so I could pair up my colors and also evenly disburse the colors across the quilt for value and balance. Now I have a plan!! The links are below if you want to download the B&W line art and do what I did!

DOWNLOAD THE SMALL LAP SIZE B&W DIAGRAM

DOWNLOAD THE LARGE LAP SIZE B&W DIAGRAM

PAIR UP FABRICS & PRECUT –
Once you’ve gathered your fabrics and perhaps decided on color placement with the diagram above, it’s time to pair up your fabrics. Pair up the fabrics according to the chart below and keep the pairs together as you begin to precut and for piecing in Week #2.

Here’s how I paired up my ‘Favorite Things’ Fat Quarters after working out the color placement.

Now you are ready to precut your fabrics!! Again keeping pairs together, precut each pair of fabrics referring to the precut directions on pages 1-2. (Again if using Fat Quarters or 6″ Design Strips plan out on paper the total units that need to be cut (found under the “If using 1/3 yard cuts” on pages 1-2) before you cut your fabric!)

Once all of your fabrics plus the background yardage is precut, you are done and ready to go for Week #2!

That’s it for Week #1 – that was fun! And I can’t wait to see all of your fabric selections! Week #2 we will begin to piece all of the blocks together! Until then, please be sure to email us at colourwerx@yahoo.com if you have any questions.  Or feel free to post questions or progress pictures on our Colourwerx QAL Facebook Group.

Until your next colour fix and next week’s QAL post ~  happy and bright quilting always!   

L&C xxoo

Feelin’ Groovy QAL – Week #5 – Putting It All Together

Yay! We made it – This is the final week/Week #5 of our Feelin Groovy QuiltAlong! There’s just a few more steps and then our quilt top will be complete! What a fun quilt!

By now, you should have all your Large Swirls appliqued onto your Slash ‘n Sew Background Blocks and all of your Spikey Paper Pieced Border Units complete….if you’re playing catch up – review the previous blog posts here:

•. Week 1 – Gather Your Materials & Pattern
• Week 2 – Slash n Sew the Background Squares
• Week 3 – Applique the Large Swirls on the Background Squares
• Week 4 – Paper Piece the Spikey Outer Border Units
•.Week 5 – Putting It All Together (this post)

As always, the companion video tutorial for this week’s post can be viewed right here:

The first thing to do is layout on your design board or floor all of your units so far. Here’s what my Baby Size version Feelin’ Groovy is looking like so far!

You can see that we still need to construct and applique stitch the Small Swirl Corner Blocks. Let’s do that!

Make the Small Swirl Corner Blocks —
Gather together (4) 8″ squares for the background of the swirls and (4) 8″ squares for your smaller appliqued swirls.

Following the same slash ‘n sew technique from Week #2 – slash ‘n sew the (4) background squares together. Square and trim these blocks to 6-1/2″ x 6-1/2″.

Again following the same techniques for machine applique from Week #3, make (4) small swirls and fuse (or iron) them to the center of each slash ‘n sew square. Applique around each small swirl. Remember to attach a stitching stabilizer to the back side of each swirl block to help your stitches stay neat and tidy. (I had many of the larger slash ‘n sew background squares left over from Week #2 so I decided to use four of these to make my swirls from. I love them).

Now that the outer corner blocks are complete, we are ready to sew our quilt top together.

Putting It All Together —
First, stitch the Large Swirls Blocks together to form rows. Then stitch rows together to form the center of your quilt top. Refer to the pattern/page 6 if needed.

Next, stitch the right and left spikey outer border units together to form (2) strips – one for the left and one for the right. Stitch these to either side of the center quilt top.

Finally, repeat the above step with the top and bottom rows of the spikey outer border units, but also stitch the outer small swirl corner blocks to the end of each row. To complete your quilt top, stitch to the bottom and top of your quilt top.

And there ya go! Your quilt top is complete and I bet it looks fabulous!! Here’s what mine ending up looking like and I love it – perfect for a new baby or small child!

This now concludes our Feelin Groovy QuiltAlong – send me your pictures so we can see your cute and fabulous quilts!

mouth21

Thank you so much for following along and for your continued support!  Look for more Colourwerx QuiltAlongs on our Colourwerx Facebook page or on our website under QuiltAlongs!

Until your next colour fix – happy quilting!  Linda & Carl xxoo

Splendor QAL: Week #4 – Layout and Finish the Quilt Top

SplendorWhoop!  Whoop!  We are almost complete with our Splendor Quilt!  This is the final week of our quilt along and I do hope you all have been enjoying making these fab flower blocks!

This week – Week #4 – is all about laying out all the blocks and pieces and stitchin’ up that quilt top.  Relax and enjoy the process – it’s easy stitchin! 🙂

1. But first, just a reminder that all of your petals (large and small) should be appliqued stitched to their individual background blocks at this point. If you need reference, refer back to Week #2 & Week #3 of our Splendor QuiltAlong posts.

Read Splendor QAL Week #2 – Applique the Small Flower Blocks
Read Splendor QAL Week #3 – Applique the Large Flower Block

Also be sure to remove all of that stabilizer from the backside of your blocks.  I like to score mine with a straight pin and carefully tear away the stabilizer using tweezers if needed in the narrower sections between the petals. 

Splendor Stabilizer

2. Next, following the Splendor Background Diagram on page 2 of the Splendor pattern, lay out all of your pieces on your design board or floor.  Take special note of which way some of the smaller flower blocks are orientated (look at the large petal on the small flower block – is it pointing  up, down to the right or to the left??  – these differences in orientation  give the circle of small flowers movement and rhythm around the large center flower block.

New Splendor Layout

Once you are satisfied with your layout, stitch the background strips to each background corner block. Refer to the page 2 of the Splendor pattern again.

Next, stitch the single background  strip to its corresponding small flower block.

Not so hard right!?!

3.  And to finish your quilt top, refer to page 5 in the Splendor pattern and begin to stitch blocks together to form a row.  You’ll have a top row, a middle row (which will consist of the larger center flower block we created in Week #3) and a bottom row.

Watch the video below for how easy!!

Once all three rows are stitched together – your Splendor Quilt top is complete!

Finished Splendor

Great job and bravo! Now you’re ready to machine quilt some awesome designs in all of that negative space in the background or  send the top to your favorite machine quilter to do the same!

I’ll be sending this off to my favorite machine quilter, Teresa of Quilting is my Bliss who also machine quilted the first Splendor quilt! Below  are some up close photos of the fabulous quilting Teresa did on the first Splendor quilt!!  I’ll be sure to post the photos of the second Splendor quilt when she completes it!
Splendor Close Up 2

Splendor Close Up 1

This now concludes our Splendor QuiltAlong – send me your pictures so we can see your beautiful quilts!

Thank you so much for following along and for your continued support!  Look for more Colourwerx QuiltAlongs on our Colourwerx Facebook page or on our website under QuiltAlongs!mouth21

Until your next colour fix – happy quilting!  Linda & Carl xxoo

Wonky Piecing & Easy Appliqué QuiltAlong – Week 1 -Gather the Pattern and Materials

Wonky Week 1 SlugHello!  And welcome to the ‘first week’ of our third Colourwerx QAL (quilt along) where we’ll be stitchin’ up Wonky Piecing and doing Easy Machine Appliqué – the fun part about this QuiltAlong is you get to choose which animal you’d like to make – A Mini ModDog, a ModCat or a pair of ModFish!

A BIG THANK YOU!!  —
First, I want to thank you so much for joining us here and for your ongoing support of our Colourwerx patterns and Colourwerx Shop during these unprecedented times – brighter days are indeed coming back soon but in the meantime since we are all still self isolating, the Wonky Piecing & Easy Appliqué Dog/Cat/Fish seemed like the perfect project!  The materials you’ll need are minimal and are likely sitting right inside your fabric stash or scrap bag.  The pattern can be purchased from our Colourwerx Shop and no matter which animal your choose (Mini ModDog, ModCat or Mod Fish), all are available in both a paper format or as a downloadable PDF format.

Regardless – Carl and I are so, so, so  happy you are here!!   Please know whether you’ll be sewing up the pattern along side us or just observing from afar, we welcome you and are overwhelmed by your enthusiasm  and so appreciative of your support  – so thank you, thank you, thank you! 

WideeyedThriftyBarebirdbat-size_restricted

As you can see below it’s a 4-week QAL this time, but please know that you can take it at your own pace and join in anytime.  All of the videos and blog posts will remain here on my blog, as well as be posted on our website and social media pages throughout the year.  There is no fee to join the QAL or our Facebook Group page so feel free to hop in anytime you are ready!

Join the Colourwerx QuiltAlong Facebook Group:   Speaking of the Facebook Colourwerx QuiltAlong Group,  if you want to join with other quilty friends and aren’t yet a member of our Facebook group, I  invite you to join our free QAL Facebook group where you can ask questions, share your progress and of course, post pictures of your finished projects so everyone can share in the fun!  Also feel free to share this invite and any other QAL news with quilty buddies and invite them to join along in the fun!

JOIN THE COLOURWERX QAL FACEBOOK GROUP HERE

Look for a companion video to be posted later this week…..

Linda Week 3

So this is Week#1 of the Wonky Piecing & Easy Appliqué QAL –  First let’s review the schedule over the next four weeks:

Week 1 (today-April 8th) – Gather Your Pattern & Materials
Week 2 (April 15) – Wonky Piecing & Cut Out Your Animal
Week 3 (April 22) – Quilt the Background Fabric & Prepare Shapes
Week 4 (April 29) – Easy Machine Appliqué & Finish

Wonky QAL Slug
Here’s what you’ll need though to join in on the stitchin’ fun –

GET THE PATTERN —
Choose Which Animal You’d like To Create and Purchase the Corresponding Pattern:
There are 3 patterns to choose from : the Mini ModDog, the ModCat and the ModFish – all of our Colourwerx patterns are now 20% off until the end of April so now’s a great time to stock up! Also our patterns are available in both a paper format or as a downloadable PDF format.

Click on the links below to purchase the patterns :
Mini_ModDog_PatternCover copy

PURCHASE THE PAPER PATTERN – MINI MODDOG

PURCHASE THE PDF PATTERN – MINI MODDOG


ModCat_CW109_FRONT


PURCHASE THE PAPER PATTERN – MODCAT

PURCHASE THE PDF PATTERN – MODCAT

CW127 ModFish Front


PURCHASE THE PAPER PATTERN – MODFISH

PURCHASE THE PDF PATTERN – MODFISH


GATHER YOUR MATERIALS —
Each animal has slightly different fabric requirements but as you’ll see below the “wonky piecing” is made from smaller length fabric strips (these strips can be orphaned jelly roll strips or cut from your stash or scrap bin).  Although the requirements below stipulate 2-1/2″ wide strips,  the strips can really be anywhere from 2″ wide to 3″ wide X 14″ in length (or thereabouts).

— For (1) MINI MODDOG, gather these fabrics: Mini ModDog
a. (10) 2-1/2” x 14” strips of coordinating fabrics
b. 1″ x 6” piece scrap fabric for dog collar
c. Scrap of black or 5/8” button for dog eye

ModCat


— For (1) MODCAT, gather these fabrics:
a. (20) 2-1/2” x 14” strips of coordinating fabrics or scrap fabrics
b. 4″ x 6” scrap for cat eyelids of coordinating solid fabric
c. 4″ x 6” scrap of dark brown or black for cat eyeballs
ModFish

— For a pair of MODFISH (using the Small Fish shapes), gather these fabrics:
a. (10-12) 2-1/2” x 14” strips of coordinating fabrics
b. (2) 9” x 4” scraps for fish bellies (can be the same fabric or two different fabrics)
c. (1) 6″ x 10” scrap of black for fish head/eyes
d. (1) 3” x 3” scrap for fish outer eyes (white)

•  Additionally, whichever animal you choose you will also need the following materials:
•  (1) Neutral Colored Fat Quarter (or an 18″ x 21″ piece of fabric) for the Background
•  (1) Fat Quarter (18″ x 21″) Size of Scrap Batting or Fusible Fleece (like Pellon 987F)
• 1/2 yard of Fusible Web (not to be confused with interfacing so please check to make sure you have a lightweight iron on advhesive) – Look for the brand names like Heat ‘n Bond Lite, Steam a Seam Lite II, Pellon Wonder Under etc…
• Your favorite threads for stitching the background fabric and for appliqué stitching around your animal shapes.

TRACE THE SHAPES ON THE FUSIBLE WEB —
To be ready for next week – ‘Week #2 – Wonky Piecing & Cut Out Your Animal’ – trace the animal shapes from the pattern on to the smooth side of your fusible web.    If you need to purchase fusible web and can’t do so for a few days , that is ok as you can make up this step in Week #2.

ScaleNOTE for PDF Pattern Users: If you purchased a PDF pattern before tracing the shapes, make sure that when you printed out your pattern page you maintained the correct scale for the pattern shapes.  You can do this by placing your ruler on the 1″ scale graphic included on each pattern shape page.  If it measures correctly, you are ready to start tracing.  If it measures less or more than the 1″ scale, then you will need to adjust your printer settings  to “Print Actual Size” and reprint the pattern pages until the 1″ scale measures correctly.

Follow the manufacturer’s directions for tracing you shapes and also:
•  Trace just one of each shape with the exception of the ModFish (trace 2 of each of the Small ModFish shapes).
•  Use a mechanical pencil or #2 pencil to trace the shapes;
•  Trace the shapes directly on the lines – you do not need to add 1/4″ seam allowance to any of the shapes;
•  Trace all of the shapes independently and apart from each other:
•  If a shape has a dotted line, include the dotted line when tracing your shape. Some of the shapes you will encounter here that have the dotted lines are:
•  Mini ModDog – Shape A – second ear
•  ModCat – EyeBalls (lower half of Cat Eye)
•  Mod Fish – Shape K (belly) & Shape M (top of fish) – when you trace Shape H – trace all the way out beyond the dotted lines to the solid line of the fish head shape.

Here’s a quick view of what my animal shapes look like when I’ve finished tracing them on the fusible web.

This slideshow requires JavaScript.

DO NOT CUT THE SHAPES APART JUST YET – JUST TRACE THE SHAPES ON THE FUSIBLE WEB SHEET AND SET ASIDE FOR WEEK #2.

Yay!  🙂  That’s it for Week #1!!  Next week – Week #2: we’ll create the wonky strip piecing units which you’ll cut your animal shapes from.

Until then, please be sure to email us at colourwerx@yahoo.com if you have any questions.  Or feel free to post progress pictures on our Colourwerx QAL Facebook Group.

Until your next colour fix and next week’s QAL post ~  happy and bright quilting always!    L&C xxoo

PaintBox QAL – Week #4 – Cutting the Triangles and Layout

Wow – can you believe we are already in Week #4 of our Colourwerx PaintBox PaintBox Front Cover copyQuiltAlong!  If you’re just joining us, you can catch up on Week #1-3’s blog posts right here:

Week 1 – Gather the Pattern and Materials
Week 2 – Sorting Your Strips Into Groups & Cutting
Week 3 – Stitching the Strips

This week is where all the magic happens and you begin to actually see your quilt top take shape!  First things first.  By now you should have stitched your strip sets together in groups as explained in detail in last week’s post – Week 3 – Stitching the Strips!

Now the fun begins where we cut the strips into the triangle shapes, and begin to play with our layout options.

Cutting the Triangles —
Gather together  the coloured strips sets and the Creative Grids Quarter Square Triangle Ruler CGRT90 .

First a word about why I love, love the Creative Grids Brand of rulers and no – they are not paying me to say this – I just happen to really like the brand. 🙂
1.  Each ruler has a firm non-slip surface so the ruler pretty much stays put on your fabric;
2. The markings on the ruler are clear and easy to read;
3. My favorite part:  each ruler has a QR code stamped on the ruler.

Yup, that little funny looking square is actually an informational code that when scanned with the QR Reader App (available for all smart devices through the App Store) will then automatically take you to a video of how to use the ruler, special tips and tricks and perhaps a free pattern or two to use with your new ruler.   This little QR code is on each and every Creative Grids ruler even the most basic straight rulers.  Just download the QR Reader app from onto your device…then open the application and your camera will appear on the screen – hover the screen of the camera over the QR code on the ruler and loike magic, you will be taken to the corresponding QR video!

Here’s a link to the tutorial from Creative Grids for the triangle ruler:

Now onto cutting your triangles!  Lay your first strip set across your cutting board and place the triangle ruler on top.  Place the top tip of the ruler aligned with the top edge of your strips – the bottom strip edge should align straight across the appropriate measurement of your ruler as diagrammed in the pattern on page 2.

Hold on though! – We can’t all be perfect piecers all the time so it’s ok if your strip set width is not measuring exactly to the desired size as specified in the pattern….a hair off here and there or a wobble in piecing between strips is perfectly ok.  You will need to cut (4) triangles from each strip set and you will find that you will have more than enough fabric to cut around your tiny imperfections in strip piecing.

TAKE NOTE THOUGH!! Next and probably the most important thing to remember about cutting the triangles is to keep the horizontal sewn seams from strip 1 to strip 2 to strip 3 to strip 4 running horizontally straight and true under the horizontal ruler lines – see page 2 Step 3 for detailed information on this step but the picture below also gives you a good idea of what to look for before making your first cut.   Cut your first triangle.

Rotate the ruler upside down and align the left diagonal edge of the ruler to the left diagonal cut edge of the strip set.  (Of course these instructions are for right handers – if you are left handed, you may be aligning on the right hand side of the strip set and then cutting from right to left).  Again before cutting make sure the horizontal seams of your strip set are running horizontally straight and true under the ruler measurement lines.

Strip Set 5

Many times you will find that after you line up the  horizontal seams of the strip set under the ruler, that the cut diagonal left edge of the strip set will not line up perfectly with the left diagonal edge of the ruler – that’s ok.  See the photo below for an exaggerated example…..

That’s ok – again, you have plenty of fabric to cut yourself a new diagonal edge.   Continue cutting the remaining (9) coloured strips sets into triangles.

Strip Set 8

Cutting the Sashing Triangles –
Gather the sashing strip sets and your triangle ruler.  Keeping the above notes in mind, follow along on page 3-4 and cut triangles from each of these strip sets.

Piece the Sashing Triangles – 
Gather the sashing triangles and following along in the pattern on page 4-Step 1-2, stitch (2) triangles together to form a larger triangle.   If you pressed each seam set in the same direction from seam to seam, you will find that when matching 2 triangles together that the seams will already go in opposite directions.

Sometimes you might have to toss a triangle in the pile to the side until a partner (with seams pressed in the opposite direction) appears in the pile.  Regardless, stitch the triangles together and press the seams in one direction.

Layout!
Now the fun begins!  It’s time to lay out all of the sashing triangles and coloured triangles in formation on your floor or design board – follow the Quilt Top Diagram on page 6.

If you colored in the B&W line art quilt top diagram from Week 1 , then this next step is easy.  If not, there’s still time and  you may want to download the line art below and have a little colouring session before  proceeding.  Believe me it makes a world of difference and at the very least give you a starting point when laying out your units.

DOWNLOAD AND PRINT THE PAINT BOX LINE ART HERE

Here’s my original drawing and my first layout….

I think I might leave this up on my design wall for a few days and ponder the layout.  Things look different after you let them ferment for awhile if you know what I mean.  And I may want to play around with the subtle color changes from strip set to strip set to see if something different happens. You can also take a photo and look at your layout from there.  It’s amazing how the photo gives you a slightly different perspective than being up close and in person.

Layout 2

As a sidenote, you may be wondering what my design wall in the above photo is made of and what it is attached to.  It is actually (2) 4′ x 8′ pieces of  lightweight foam insulation board (available from Lowes or Home Depot) and then covered in batting.  They are then attached with 3M sticky tabs to the sliding glass closet doors in my sewing studio. Viola!  Instant design wall and storage space in the closet!

That’s it for this week!  Join us next week for Week #5 – Quilt Top Assembly.  I’ll report back if I changed anything in my Layout above and then how to stitch the rows together to finally assemble your quilt top.

Until then, please be sure to email us at colourwerx@yahoo.com if you have any questions.  Or feel free to post progress pictures on our Colourwerx QAL Facebook Group.

Until your next colour fix and next week’s QAL post ~  happy and bright quilting always!    L&C xxoo


A Brite Idea – Match the Selvage Dots

Brite-Idea-LogoWhen we owned our shop, Linderella’s Quilt Works, many times we heard our customers say they were  “…just no good at matching fabric or picking colours” or that they had  a favorite piece of fabric but just no idea what to place with it….well, here’s an easy tip that will never fail you….look to the selvage edge….yup – that’s right!  Those colourful little dots not only tell you every colour the screen printers used in creating that fabric – but it also serves as the handiest guide in the universe to help you mix and match other fabrics with it!

For example, pictured below is a wild piece of Kaffe Fassett (well – actually most of his fabric is pretty wild, right?!)  And to the right –  are the selvage dots located on the edge of the fabric.  There are 12 color dots varying in values of pink, purple, chartreuse,  teals, orange and even a bright red and a ruddy brown-like burgundy (check out #6 & #11).  I never saw these colours in the print until I looked at the selvage.

First, I went to my Kaffe stash – Here’s a quick pull that mixed nicely with this print – lovely!  But I know, I know – some of you are saying, “….too easy – everything Kaffe goes with Kaffe…..”
Kaffe Match Up
Ok….how about this combination? These are some gorgeous new batiks from Laundry Basket Quilts – designed by Edyta Sitar’s for Andover Fabrics called “Splash of Color”!   I love that ruddy red (#11) and would have never thought of picking that colour would it not for the selvage dots.  This collection is available now so yes, please go to your local quilt shop and ask for it!
Edyta Match Up(Full disclosure here:  Edyta and I met at Quilt Market and she liked our Colourwerx patterns so much that she asked if I would use some of her batiks to make a few new samples of my patterns using her new batik line – Why yes!  :-), of course I would be delighted to!!  These projects will soon be posted.) 

Actually I do think I like this batik combo better than the Kaffe combo above as the batiks give that Kaffe fabric a whole new rhythm.  Not pictured but equally beautiful would be a mixture of a half dozen Kona Cotton Solids mixed with the Kaffe print to really set it off!  (Of course batiks don’t have a selvage edge so if you’re starting with a favorite batik and stumped – seek out your colour wheel for guidance or the assistance of your quilt shop.)

So dig deep in the stash for that favorite fabric you’ve been fondling all these years, study the selvage edge and then head off to the quilt shop to match fabrics to make something gorgeous! Until your next colour fix! ~ Linda & Carl

On the Road Again….

Glendale 1We just returned from vending at the 2017 Glendale Quilt Guild show and for us, it was a first of many things:

  1. …the first time vending in California;
  2. ….the first time vending as Colourwerx and not Linderella’s;
  3. …and the first time Carl and I vended together as a team without one of us being in the booth and the other in the shop.Glendale 2

All in all, it was fun time and the Glendale Quilt Guild put on a marvelous show with hundreds of quilts on display and several nice exhibits and boutiques.  It was held at the Pasadena Convention Center – a somewhat familiar setting for us as this was our home turf some 15 years ago.

Our small, but cozy 10 x 10 booth was an experiment of sorts – seeing whether we could survive with each other in such a small space for longer than 3 hours – I’m happy to report that we did!  Here’s a little tour of our booth – a major plus was the nicely patterned carpet at the convention center and tons of natural light!

This slideshow requires JavaScript.

BlueDogWe brought our inventory of Colourwerx patterns and also added the popular Mini ModDog fabric kits (a hit!), fabric packs for Spikey & ModTV,  as well as our new colouricious Kona Cotton bundles (yummmmm!)  –  a special, curated blend of  luscious CW Bundlescolours to inpire you.  The MOD TV fabric kit was the runaway hit followed closely by the Mini Mod Dog fabric kits!  I’m happy to report, as you might have guessed, that these items are also now available in our shop!

Of course, there were many beautiful quilts on display!  A few of my favorite quilts from the show were these below – find the title and credit to the quiltmaker when you click on the picture.

All in all I think the weekend went very well – we met many new faces, met up with some old friends and had a great time.

Next stop on our road tour?  You’ll find us here:
•  October 2017 – Quilt Market (Houston, TX)
•  January 2018 – Road to California (Ontario, CA)
•  February 2018 – Quilt Con – Modern Quilt Guild (Pasadena, CA)

Hope to see you there!  Until you next colour fix~
Linda & Carl

The “Tattooed” Mini Spikey & ModDog

Early February,  we had the honor of creating a mini version of our “Spikey” quilt for our andoverfriends over at Andover Fabrics using Canadian artist and fabric designer, Libs Elliott’s,  newest collection called “Tattooed”.  The quilts commissioned were to be hung in the Andover Booth at the QuiltCon East Convention that took place in Savannah, GA.  We were beyond excited and thrilled to meet the challenge.

IMG_4851“Tattooed” fabric is just starting to hit your local quilt shops, and if you haven’t seen it yet – go check it out….It is a gorgeous collection of richly saturated jewel toned prints and makes the most perfect rainbow quilt or added to your stash is a great basic. You can also check out more of Libs Elliott’s quilts and her designs at her website …..her work is really innovative and fabulous as she uses computer code to create her designs.IMG_5008

Back to the mini “Spikey” – first I needed to arrange the “Tattooed” fabrics in my preferred color order.  Additionally, because we had a size requirement, I needed to reduce the Spikey triangle template to 3″ in length (instead of the original 8″ length).  These were going to be some tiny triangles!  The background and borders were cut from Andover fabrics Chambray collection – this is a beautiful woven fabric that creates texture, depth and movement to the background.  Love it and I absolutely need more now!

I then began the task of sewing triangles together…With our Spikey pattern the key to matching the triangles up is to offset the 2 triangles by just about 1/8″ and sew a perfect (not scant) 1/4″ seam – before I set out to sew any “Spikey” quilt I always have to do several test runs until I get it just right and then I set that pair of triangles off to the side as my reference while sewing all of the others. (Click on the photos to enlarge).

Once done – the mini Spikey was ready for quilting…since I don’t consider myself the most expert machine quilter, I used a monfilament thread and simply quilted a 1/4″ away from all of the spikes and then quilted abritrary lines in and out through the outer borders….Sometimes simple is better….and Voila – done! (You can click on the photos below to enlarge 😉

So off it shipped to be placed in the Andover Fabric quilt gallery.  What a thrill to see our mini Spikey displayed with all of the other gorgeous quilts in the Andover Fabric booth at Quilt Con East….I love the eyeball pillow and the jewel quilt, don’t you? it was thrilling to see it displayed with all of the other gorgeous work.

While making the mini Spikey, we also toyed around with making an additional project from the “Tattooed” fabric  – a mini “ModDog! He, alas, did not make the cut….oh well…

dog pillowBut here are the results!   I first wonky slashed ‘n sewed some “Tattooed” strips together and cut out the dog body.  Then I textured the Chambray background with straight stitching lines using a collection of brightly colored 12 weight Aurifil threads – these are deliciously weighty threads and work perfectly through my Bernina sewing machine using a 90/14 size topstitch needle….no problem!  And I love the way the background looks!  Next, I appliqued around the dog with a 50 weight Aurifil thread, added a piece of gorgeous Renaissance Ribbon for a collar, and even fussy-cut  a “handmade tat”  from Libs’ previous collection “True Love” for his rear end – ha! I think he came out super cute and we’re plotting more of these in the future!

Many thanks to Giusseppe and Daryl at Andover Fabrics for the opportunity and to Libs Elliot for designing such a gorgeous collection.  And if you like our “Spikey quilt or “ModDog” pillow, you can purchase patterns for the larger versions from our Colourwerx website or a PDF download from our Colourwerx Craftsy site.

Until your next colour fix~
Linda & Carl