PaintBox QAL – Week #4 – Cutting the Triangles and Layout

Wow – can you believe we are already in Week #4 of our Colourwerx PaintBox PaintBox Front Cover copyQuiltAlong!  If you’re just joining us, you can catch up on Week #1-3’s blog posts right here:

Week 1 – Gather the Pattern and Materials
Week 2 – Sorting Your Strips Into Groups & Cutting
Week 3 – Stitching the Strips

This week is where all the magic happens and you begin to actually see your quilt top take shape!  First things first.  By now you should have stitched your strip sets together in groups as explained in detail in last week’s post – Week 3 – Stitching the Strips!

Now the fun begins where we cut the strips into the triangle shapes, and begin to play with our layout options.

Cutting the Triangles —
Gather together  the coloured strips sets and the Creative Grids Quarter Square Triangle Ruler CGRT90 .

First a word about why I love, love the Creative Grids Brand of rulers and no – they are not paying me to say this – I just happen to really like the brand. 🙂
1.  Each ruler has a firm non-slip surface so the ruler pretty much stays put on your fabric;
2. The markings on the ruler are clear and easy to read;
3. My favorite part:  each ruler has a QR code stamped on the ruler.

Yup, that little funny looking square is actually an informational code that when scanned with the QR Reader App (available for all smart devices through the App Store) will then automatically take you to a video of how to use the ruler, special tips and tricks and perhaps a free pattern or two to use with your new ruler.   This little QR code is on each and every Creative Grids ruler even the most basic straight rulers.  Just download the QR Reader app from onto your device…then open the application and your camera will appear on the screen – hover the screen of the camera over the QR code on the ruler and loike magic, you will be taken to the corresponding QR video!

Here’s a link to the tutorial from Creative Grids for the triangle ruler:

Now onto cutting your triangles!  Lay your first strip set across your cutting board and place the triangle ruler on top.  Place the top tip of the ruler aligned with the top edge of your strips – the bottom strip edge should align straight across the appropriate measurement of your ruler as diagrammed in the pattern on page 2.

Hold on though! – We can’t all be perfect piecers all the time so it’s ok if your strip set width is not measuring exactly to the desired size as specified in the pattern….a hair off here and there or a wobble in piecing between strips is perfectly ok.  You will need to cut (4) triangles from each strip set and you will find that you will have more than enough fabric to cut around your tiny imperfections in strip piecing.

TAKE NOTE THOUGH!! Next and probably the most important thing to remember about cutting the triangles is to keep the horizontal sewn seams from strip 1 to strip 2 to strip 3 to strip 4 running horizontally straight and true under the horizontal ruler lines – see page 2 Step 3 for detailed information on this step but the picture below also gives you a good idea of what to look for before making your first cut.   Cut your first triangle.

Rotate the ruler upside down and align the left diagonal edge of the ruler to the left diagonal cut edge of the strip set.  (Of course these instructions are for right handers – if you are left handed, you may be aligning on the right hand side of the strip set and then cutting from right to left).  Again before cutting make sure the horizontal seams of your strip set are running horizontally straight and true under the ruler measurement lines.

Strip Set 5

Many times you will find that after you line up the  horizontal seams of the strip set under the ruler, that the cut diagonal left edge of the strip set will not line up perfectly with the left diagonal edge of the ruler – that’s ok.  See the photo below for an exaggerated example…..

That’s ok – again, you have plenty of fabric to cut yourself a new diagonal edge.   Continue cutting the remaining (9) coloured strips sets into triangles.

Strip Set 8

Cutting the Sashing Triangles –
Gather the sashing strip sets and your triangle ruler.  Keeping the above notes in mind, follow along on page 3-4 and cut triangles from each of these strip sets.

Piece the Sashing Triangles – 
Gather the sashing triangles and following along in the pattern on page 4-Step 1-2, stitch (2) triangles together to form a larger triangle.   If you pressed each seam set in the same direction from seam to seam, you will find that when matching 2 triangles together that the seams will already go in opposite directions.

Sometimes you might have to toss a triangle in the pile to the side until a partner (with seams pressed in the opposite direction) appears in the pile.  Regardless, stitch the triangles together and press the seams in one direction.

Layout!
Now the fun begins!  It’s time to lay out all of the sashing triangles and coloured triangles in formation on your floor or design board – follow the Quilt Top Diagram on page 6.

If you colored in the B&W line art quilt top diagram from Week 1 , then this next step is easy.  If not, there’s still time and  you may want to download the line art below and have a little colouring session before  proceeding.  Believe me it makes a world of difference and at the very least give you a starting point when laying out your units.

DOWNLOAD AND PRINT THE PAINT BOX LINE ART HERE

Here’s my original drawing and my first layout….

I think I might leave this up on my design wall for a few days and ponder the layout.  Things look different after you let them ferment for awhile if you know what I mean.  And I may want to play around with the subtle color changes from strip set to strip set to see if something different happens. You can also take a photo and look at your layout from there.  It’s amazing how the photo gives you a slightly different perspective than being up close and in person.

Layout 2

As a sidenote, you may be wondering what my design wall in the above photo is made of and what it is attached to.  It is actually (2) 4′ x 8′ pieces of  lightweight foam insulation board (available from Lowes or Home Depot) and then covered in batting.  They are then attached with 3M sticky tabs to the sliding glass closet doors in my sewing studio. Viola!  Instant design wall and storage space in the closet!

That’s it for this week!  Join us next week for Week #5 – Quilt Top Assembly.  I’ll report back if I changed anything in my Layout above and then how to stitch the rows together to finally assemble your quilt top.

Until then, please be sure to email us at colourwerx@yahoo.com if you have any questions.  Or feel free to post progress pictures on our Colourwerx QAL Facebook Group.

Until your next colour fix and next week’s QAL post ~  happy and bright quilting always!    L&C xxoo


PaintBox QAL – Week #2 – Sorting Your Strips into Groups & Cutting

PaintBox Front Cover copyWelcome back to Week #2 of the Colourwerx Paint Box QuiltAlong!  This week is all about sorting your strips into color groups and cutting.

Also, just a friendly reminder!   If you want to join with other quilty friends and aren’t yet a member of our Facebook group, I  invite you to join our free QAL Facebook group where you can ask questions, share your progress and of course, post pictures of your finished projects so everyone can share in the fun!  Also feel free to share this invite and any other QAL news with quilty buddies and invite them to join along in the fun!

JOIN THE COLOURWERX QAL FACEBOOK GROUP HERE

GATHER YOUR MATERIALS:   By now you should have selected your materials, purchased your pattern and gathered the speciality triangle ruler and other sewing notions if needed.  But just in case, we’ll review what you need super quick:

•  The PaintBox pattern by Colourwerx (CW-124) – you can purchase this at our shop and choose either a paper edition or electronic PDF edition;

PURCHASE THE PAINTBOX PATTERN – PAPER VERSION
PURCHASE THE PAINTBOX PATTERN – PDF VERSION

•  A strip roll (or jelly roll) – choose a strip roll containing (40) precut 2-1/2″ wide strips.  If you’d like to “bust your stash” – Cut (40) 2″ wide x 41-43″ long strips from your stash;

•  Sashing Triangles & Binding  – choose two coordinating fabrics that match or compliment your strips – these fabrics make up the “sashing triangles” – You’ll need a 1-yard cut of each fabric.

•  A Speciality 90 Degree Ruler  for Cutting the Triangles – the Creative Grids Quarter Square Triangle Ruler CGRT90.  I really like the Creative Grids brand of rulers! We also have these available for purchase in our Colourwerx shop!

PURCHASE THE CREATIVE GRIDS TRIANGLE RULER HERE

WHAT DID I CHOOSE TO USE?  Last week you might recall I was alternating between two different jelly rolls I had in my stash.  I finally settled on the Laundry Basket Linen Texture roll and added two 1-yard cuts of Edyta’s gorgeous linen fabrics for the sashing triangles.  The coordinating colors I chose were Linen and a Dark Teal.   Thanks to the good peeps at Fat Quarter Shop my added yardage I had to order arrived this afternoon just in time for me to write this blog!

Linda's PB Fabrics

SORT YOUR STRIPS INTO COLOUR GROUPS –
This task is probably the hardest step in making this quilt.  There are so many choices and none of them are wrong. You’ll first need to come up with 5 color groups – each group containing 8 strips. Each grouping will then be subdivided into (2)  subgroups containing (4) strips each.

Last week I provided a link to this  handy black and white diagram below  to assist you in planning your colour placement for your Paint Box quilt.  You can use crayons, colored pencils or markers – whatever works for you.  Here’s the link again just in case you missed it:

DOWNLOAD AND PRINT THE PAINT BOX LINE ART HERE
Paintbox Layout

If your strip roll contains duplicate strips or as often is the case – 20 different fabrics with 2 strips of each fabric – this task is a bit easier for you.  Just divide the strips into 5 color groups selecting 4 different fabrics for each group.  If the fabric strips are duplicated, then you would place (2) strips from each of the 4 fabrics selected in that group to total the (8) strips assigned to each group.

Paint Box Color Grouping 2
If your strip roll has (40) different colored strips – the task is a little harder. You will need to come up first with five color groups – then subdivide each group into two sub groups and place 4 strips in each subgroup.

Paint Box Groupings

My Laundry Basket Linen strip roll had (40) strips but the strip colors, hues  and variations were very subtle. Here’s an example of the some of the color variations I found across the amber /green spectrums.

I settled to make (10) distinct color groups with (4) strips in each group. Whenever I start a new PaintBox quilt, I like to lay out the strips in their color groups on my floor to audition what that center square might look like and also ensure that all that fabrics are “playing nicely” in their individual color groups  as well as across the quilt top. Here’s what mine looked like:

Linda's Strips

I also found coloring in the B&W line art drawing most helpful and used the subtle variances in the color groupings to make an almost rotating pinwheel of changing colors around the  quilt top. I think this might look neat but I won’t really  know until I get the quilt top together and that’s the fun of it!   Here’s what my B&W line art quilt top looked like after I colored it in:

Linda's Paint Box

CUTTING THE STRIP ROLL STRIPS TO 2″ WIDE –
Once you’ve placed the strips in color groupings, you’re ready to cut each strip down to 2″ wide (unless of course you have cut from your stash and then hopefully you have already cut them at 2″ wide).  That’s right each strip needs to be 2″ wide before we start stitching them together.  Take your time in doing this and be accurate!

BUT WAIT!!!  I must confess that often times I cut the strips down to this width after I have stitched pairs of strips together.  I’ll talk more about this step next week, but here’s an example : I’ve stitched  (2) 2-1/2″ wide strips together with a scant 1/4″ seam allowance.  Before pressing the strips open, I place them (still Right Sides Together) on the cutting board, line up the 2″ mark of the ruler on the stitched side and then cut the width to 2″ wide. Easy Peezy!  However if that makes you nervous, then by all means, trim each of your strips to 2″ wide.

CUTTING THE COORDINATING FABRICS INTO STRIPS –
Next gather the (2) coordinating fabric.  Choose one to also be your biding fabric.  Follow the cutting instructions and dimensions on page 1 of the pattern and cut your coordinating fabrics into strips.

That’s it!  You are now ready for Week #3 – Stitching the Strips together!  See ya then! 

Until then, please be sure to email us at colourwerx@yahoo.com if you have any questions.  Or feel free to post progress pictures on our Colourwerx QAL Facebook Group.

Until your next colour fix and next week’s QAL post ~  happy and bright quilting always!    L&C xxoo


Fall Quilt Market Fun!

IMG_8338
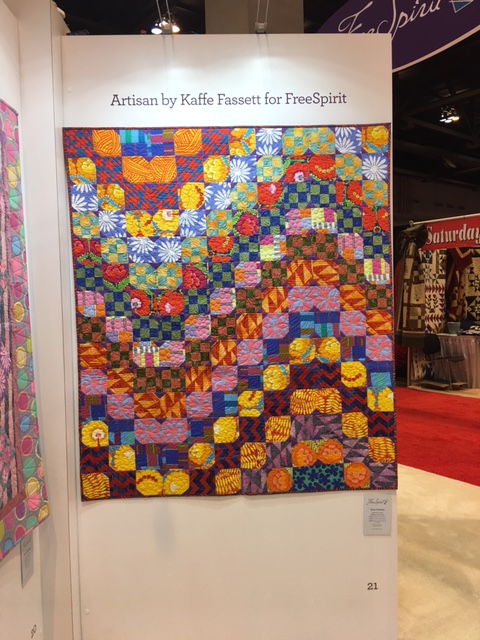
It’s been a whirlwind these last few weeks (in fact the whole year!) but I  finally found time to sit down and share with you our experience at the recent International Quilt Market in Houston, Texas.  The International Quilt Market took place October 26th-28th (always over my birthday wouldn’t you know it!) and is THE PLACE to see all the new fabrics, patterns and products by shop owners and industry professionals before they arrive in the shops some six months later.

We didn’t have a booth this time around but rather chose to “be free” and able to roam the show floor – this was a first for us and very liberating!  As always, Market is full of seeing old friends, meeting new ones , super fun antics and just an all around generally inspiring, terrific quilty experience!

We debuted six new patterns for Quilt Market – You can see them below in the slide show, and we’ll highlight each of these new patterns  in future blog posts, but all are available for order in our Colourwerx shop right now!

This slideshow requires JavaScript.

We had several versions of our new quilts displayed with various companies throughout the quilt market floor.

First, we collaborated again with our good friends at Island Batiks and five of our quilts were displayed in a special preview window at the front of the Island Batiks Booth (slideshow below).  All of these quilts were made using the new and super gorgeous Jewel Box Batik Collection designed by Kathy Brett Engle for Island Batiks and coming to a shop near you in February 2020.   Check out the fabrics in the link above! Just lovely!!

This slideshow requires JavaScript.

We also collaborated again with our  partners at Free Spirit Fabrics and always welcome opportunities to make our new patterns using Kaffe Fassett’s newest fabrics or other beautiful collections coming soon.  Here’s our PaintBox pattern in both the Warm and Cool colorway of Kaffe’s new fabrics- arriving in shops in February 2020 and we will also have kits available too.

We  also made our new Waterfall pattern in Martha Negley’s newsest fabric collection called Veggies – I am super in love with the rich jewel tones of Martha’s newest collection and the vegetable designs of carrots, beets and cabbage are to die for – it partners super well with all things Kaffe and I just love it .

Martha Nagly Waterfall

Continuing on with our collaboration and great friendship with Christa Watson of Christa Quilts.com – I was thrilled when she asked if I would make our new Paint Box pattern in her new fabric collection called GridWork.  Of course I would!  Here’s the finished version and of course a cute picture of Christa & I in her colorful booth at Quilt Market. Her new fabrics, GridWork will be coming to your local quilt shop in February!

We also formed a new relationship with Windham Fabrics and their popular fabric designer, Carrie Bloomston.  You all know Carrie by her popular fabric design, Love Newsprint that we sell in our Colourwerx shop right here!

Screen Shot 2019-11-11 at 12.48.34 PM

Carrie’s fabric collections are always full of whimsical motifs and adventures and mostly have a collage look with super beautiful color palettes of magentas, turquoises and golds.  Her newest collection “Wish” was fabulous and fun and we were thrilled to make our ModBlossom quilt for display in her booth!  Carl and  loved meeting Carrie and also love her new Wish fabric collection which will be coming to shops in the Spring!

Last but not least and perhaps most exciting, because we were free to roam the show floor, we were finally able to share our fabric design portfolio with many of the fabric companies’ design directors.   We can’t say anything just yet, but Carl and I were super pleased by the positive feedback we received regarding our fabric designs and are excited to explore this additional design avenue in our business! Look for more news on this in the very near future! 🙂

img_8339.jpg

Until your next colour fix – thanks as always for following along and Happy Fall!  L&C xxoo


ModTiki – Missouri Star Quilt Company Style!!

Aloha BashLast month, the Missouri Star Quilt Company and Jenny Doan celebrated their 11th year in business with an enormous Birthday Bash weekend!  It was a grand party with lots of festivities, special guest teachers, stitchin’, eatin’ and dancin’  galore and lots and lots of quilters gathering together for a weekend of fun in Hamilton, MO with Jenny and everyone at MSQC.

This year’s theme was an Hawaiian Luau theme and appropriately titled the “Aloha 11th Birthday Bash” celebration.

IMG_8196Although Carl and I were not there – our ModTiki pattern was.  Our  happy little fella had been selected as the weekend’s thematic pattern for members of MSQC to make their own tiki which would then be displayed in shops and on the main street during the birthday bash weekend!   What a thrill and Carl and I couldn’t have been more proud of their creations.  Each one was lovingly made by quilters and non-quilters from MSQC,  and each person who made one was asked to personalize the tiki in whatever way he/she wished.  Here’s a brief slideshow of the many tikis that were posted around town !!


This slideshow requires JavaScript.

Barb and Mary of Me & My Sisters Designs who were guest teachers also made their own personalized version below – love the dresden petal skirts and the flip flops.

IMG_7084

And here’s Jenny’s version – can you guess who this might be?  Yes – a self portrait of her and her husband, Ron!

IMG_8199

All in all, a very fun time was had by all and we thank Jenny and everyone at MSQC for IMG_6827choosing to use our ModTiki pattern to celebrate their 11th birthday bash in style.  Sending kisses and a giant MAHALO to you all!

If you’d like to make your own version of our ModTiki – you can purchase the pattern right here in our Colourwerx shop!  We would love to see what you come up with!

Mahalo my friends and until your next colour fix~  L&C xxoo


ColourMaze QAL -Week #4 – Assembly & Borders

ColourMaze Front Cover(1)Welcome back!  We’re in the last week of our amazing ColourMaze QuiltAlong!  This week is all about stitching the ColourMaze Blocks together to form vertical rows and then completing your quilt top by sewing those rows together!  If you’re doing placemats or a table runner – just refer back to the pattern on pages 5 & 6 for sashing and border directions!

As always, there is a fun short companion video to this post.  So if you’re more of a ‘visual’ person, then hop on on over to our Colourwerx You Tube Channel and subscribe to view the video!

LInda Week 4
Let’s get stitchin’!!  Once your ColourMaze blocks are complete, you’ll then stitch the remaining  1″ strips to the top edge of each block.  For tips and trick on sewing those thin little strips to your blocks, check out Week #3’s ColourMaze QAL here.  If you’re making the Lap Quilt – you should have (3) 1″ strips left – set those aside.

While you’re at the machine – just go ahead and stitch the sashing and outer border strips together too.  All of the directions are on pages 5 & 6 of the ColourMaze Pattern.

Next the fun begins – lay out on your design wall or floor the blocks in the order you prefer!  Notice that I bolded the words “you prefer” – that’s because there is no right or wrong way to do this.  I usually just choose a layout because I’m either pleased with how the order and colors flow from one block to another such as the Violet Craft Modern Classics sample below:

….Or I follow color wheel order like the Kaffe Fassett sample below….

Anything goes!  Once you’ve decided your order, stitch those remaining (3) 1″ strips to the bottom edge of the the bottom block in each row.   Now you’re ready to start stitching block to block to block to form vertical rows.   On my Violet Craft Modern Classics sample, here’s Row #1….
Row 1

And Row #2….
Row 2

And Row #3….
Row 3

Next, stitch the sashing strips on to one side of each vertical row!  Now  you”re ready to stitch the rows together to complete your quilt top.

Colourmaze Geo 1

Geo Pop on Black (purchase a kit from christaquilts.com)

But wait – I have a tip!  Sometimes when stitching these long vertical rows together, the top row may creep ahead of the bottom row thus causing those strong horizontal lines (which were/are the 1″ strips in each block) to look off kilter.  Part of the illusion of the ColourMaze design is that when all those little horizontal strips are lined up parallel across the vertical rows, it looks like a maze.  So wouldn’t it be rather maddening after all your work  to have them unparallel across the rows once the top is done? I think so!

So here’s what I do…. first, I place my two rows Right Sides Together.  I then pin as usual but when I come to a place in the pinning where the thin strips need to stay aligned and parallel to each other from block to block – I “sneak, peek and pin” –  🙂  yes,  a very technical term.  But here it is a nutshell:  I peel back the top row just enough so I can sneak a peek and realign the strips so that they are directly on top of each other.  I then fold back the top layer to match to up the edges and pin in place.  Works like a dream and almost always those thin little strips are aligned and parallel from each other from row to row!

Once you have the three rows stitched together – just finish off your ColourMaze quilt top by stitching the last outer border strip onto the remaining edge!  And now you are complete and ready for the big reveal to family and friends!  Great job!  Go celebrate!

And what to do with all of the offcuts from the strips – how about make some scrappy binding!  Here’s mine…I just sewed all the scrap strips together and made more than enough binding for my lap quilt!
Binding

This now concludes our ColourMaze QuiltAlong!  Thank you so much for following along and for your continued support!  Look for more Colourwerx QuiltAlongs on our Colourwerx Facebook page or on our website under QuiltAlongs!mouth21

Until your next colour fix – happy quilting!  Linda & Carl xxoo


ColourMaze QAL – Week #2 – Sorting your Strips & Cutting

Hi guys!  We are in Week #2 of the Colourmaze QAL!  Welcome back!

materialsjpg.jpgJust to recap – Week#1 was all about getting the ColourMaze pattern (still available from our Colourwerx shop by clicking here) and also choosing your fabrics: A 40-piece 2-1/2″ strip roll and 1-3/4 yards of background fabric – you can of course cut the (40) 2-1/2″ strips from your stash too!  If you’re new this week, then just jump on in! You can review Week#1’s blog post here!

Also, our free Colourwerx QAL Facebook Group is really where all the action is and everyone is encouraged to ask questions, share  progress and of course, post pictures of  finished projects so everyone in the group can share in the fun!  We’re also doing weekly giveaways here too!  Click below to join the Colourwerx Quilt Along Facebook Group  or feel free to share this invite and any QAL news with other quilty buddies and invite them to join along in the fun!

JOIN THE COLOURWERX QAL FACEBOOK GROUP HERE

Screen Shot 2019-09-22 at 4.32.55 PM
Just like last week – Carl and I put together a little companion video to Week#2 QAL recapping this blog post along with tips and tricks.  You can view it on our  Colourwerx UTube channel so if you’d like to watch me ‘yak on’ instead of reading this post – you’ll find that video here…

Linda Video Wk 2

So let’s get started!   WEEK #2 – Sorting Your Strips & Cutting
To prepare you for piecing which is next week (and really, that’s the super fun part of this quilt, right?!?), you’ll need to cut your background fabric and strips this week!

  • Sort and Pair up the Strips! Unroll your strip roll and begin to group together strips into pairs.  Each pair of 2-1/2″ strips will make (1) ColourMaze block.    So if you want to make a couple of placemats, place together (4) pairs of strips for (4) placemats!   If you are making the 50″ x 70″ pattern cover quilt. group together (20) pairs of strips.  You may choose to pair your strips tone on tone, contrast or just random – whatever suits your fancy 😀.IMG_6988
    In Week #1’s post, there’s a slide show of different ColourMaze quilts showing the finished blocks so you can see that almost anything goes when pairing up the strips.
  • Screen Shot 2019-09-22 at 4.26.21 PMCut Your Background Fabric:  First off, before cutting – I really, really, really  like to starch my fabric.  Mary Ellen’s Best Press is terrific stuff but it its too pricey to use on larger pieces and when I need to starch several yards or a larger piece such as this background fabric, I use the Faultless Gold Top Firm Finish Spray Starch. First you can’t beat the price at like $1.99 a can – available at Target, Walmart, the supermarket, etc….  Secondly, I just happen to love the way it makes my fabric feel.  It gives the fabric a firm hand but not too stiff and makes my cutting and piecing more precise.  Use a hot dry iron (no steam) and definitely starch the fabric before you make that first cut as the fabric may shrink ever so slightly after the starch is ironed dry.

You’ll find all of the cutting directions and dimensions in the Colourmaze pattern on pages 1 & 2.CW Strips

You’ll see in the pattern that you’ll need to cut  lots of 1″ strips from the background fabric – in fact you’ll actually be cutting a few dozen 1″ strips.  The idea of cutting 1″ strips seems easy enough but these smaller width strips can be tricky,  especially when you cut strip after strip after strip after strip after strip after…. – well you get the idea, right?

So first, I encourage you to change your rotary blade to a fresh new one for extra sharpness, and always use a good quality rotary ruler to measure the strip widths and to cut against.

Week 2 Blade
Just a little sidenote before cutting your fabric.I know some people like to use their rotary cutting mat to measure the width of strips but I can tell you from experience that cutting mats are notoriously “off” – why you ask?  The measurements are ‘printed’ on the cutting mat and the super thick line on the mat can throw off your cut by 1/32nd or 1/64th of an inch.  Additionally those printed measurements can expand and contract with heat and cold and also with general day to day use.   This all leads to tiny inaccuracies in your cutting but compounds itself cut after cut after cut.   It’s ok to use the cutting mat for general measurements such as to quickly check if a block is measuring 9-1/2″ x 9-1/2″ but for super accurate cutting and squaring down please use a good quality quilting ruler to measure and cut against not the cutting mat- just mho! 😉

First Tip on Cutting the Background Fabric  – I like to reduce the distance I need to travel with my rotary cutter from the bottom of the fabric to the top.  Once I find the straight of grain of the fabric (and here’s a great tutorial if you need one), I then match selvage edges at the top with my fold at the bottom.   I then fold my fabric in half again  – this reduces  the distance my rotary cutter needs to  travel from 22″ to 11″.   Yes,  I am cutting through four layers of fabric instead of two, but my rotary cutter is only traveling the length of 11″ to cut a strip….therefore reducing the likelihood of my ruler slipping or sliding from side to side resulting in an inaccurate cut.  Additionally, less pressure is needed to hold the ruler in place therefore less pain or cramping in my wrist or hand  if cutting for longer periods of time.  A win-win!


Once you are ready to begin, be sure to always cut yourself a fresh clean edge before proceeding to cut your strips.

Clean Edge

Next tip 🙂  –  I have found that sometimes after cutting 8, 9 or 10 strips in a row, sometimes it becomes impossible to precisely line up the ruler on the edge of the fabric straight – it’s as if the fabric edge has been warped or skewed and the edge is generally not true to the line under the ruler (at least not like it was when you made your very first clean cut). This happens because as you cut strip after strip, you are placing a lot of pressure 1) against the ruler by holding it steady in place and 2) by sliding the rotary cutter along the side of the ruler as you cut consecutive strips (especially smaller width strips like 1″ strips).

Ruler Skewed
So it’s not uncommon to see this and its a good practice that after cutting 10 or so strips, to simply cut a fresh, new clean edge to ensure you are cutting accurately and of course, to line the ruler up against.

Next up…..IMG_7051

  • Cut Your Fabric Strips for the ColourMaze Blocks:  Again, you’ll find all the dimensions to cut your block pieces, on pages 1 & 2 of the Colourmaze pattern.  Every (2) 2-1/2″ strips will yield (1) ColourMaze block, and after cutting the block pieces, you may indeed have some generous offcuts – think about whether you might like to make more Colourmaze blocks or save those offcuts for a scrappy binding.  Make sure you UNFOLD each strip and then cut your block pieces so you will be left with a longer offcut to use for other projects.

Additionally, in last week’s post I mentioned that if you are making the  50″x70″ Lap Quilt there are actually (21) blocks needed and you might be asking yourself “Where do I get the extra 2 strips for that 21st block if I am using a 40-piece strip roll ?”  Well I have the answer…..

If your strip roll has at least 2 different fabrics that are duplicated within the strip roll then you can pair these 4 strips together,  cut them for efficiency and yield 3 Colourmaze blocks out of these 4 total strips.

So first things first – look at your (40) strips and pull out the strips that are duplicated .   You need to locate a minimum of 2 fabrics that are duplicated – pair up these fabric strips (so you should have 4 strips total, 2 from Fabric A and 2 from Fabric B).

Duplicate Strip

Unfold the first Fabric A strip, cut the selvage edge off and then cut the (4) pieces specified in the pattern for (1) ColourMaze block starting with the largest unit to the smallest unit.

Strip Cut 1

With the leftover from strip #1, begin to cut the 2nd block’s pieces, Cut the largest unit first, and then with what’s left cut the smallest unit.   In other words, you may need to go out of order from the pattern.   Use the whole strip up!

Strip Cut 2

Unfold the the second Fabric A strip (aka the same fabric as the first) and continue to cut the remaining units required for the second block. If all works out, you should be left with approx. 29″ – just enough to cut the units for a 3rd ColourMaze block (i.e.: the 21st block for the lap size cover quilt).

Strip Cut 3

Repeat the above on the matching Fabric B strips to pair up with Fabric A.   Keep in mind that not all fabric strips are manufactured at exactly the same length – some are 44″ long, some 43″ and some even 42″….so before making your first cut on the fabric strips, mark out the segments on the strip with a washable marker to make sure you can get all the required pieces to make (3) blocks.

I demonstrate this in the companion QAL video here.

So this week is all about cutting – take your time, and remember that old phrase – measure twice, cut once!  And if you have any questions or need any additional assistance, please email Carl and I at colourwerx@yahoo.com or message us on our Facebook Colourwerx or Colourwerx QuiltAlong pages.

Be sure to check back in next week – Week #3 for Piecing the Block where I’ll share my all time favorite tip and tricks to perfect your 1/4″ seam and precision piecing skills! 

Thanks again for joining in on the quilt along fun and I can’t wait to see everyone’s blocks soon!   Until your next colour fix~ L&C xxoo


Abstract Garden Blog Hop & Giveaway!

AbstractGarden_bloghopWINNER  WINNER! 

Congratulations to Allison!!  Molly (our Beagle) selected Comment #72 – Allison in Alabama –  with the Random # Generator  as the Winner of our Colourwerx/Abstract Garden giveaway!  Hurray, and congratulations to Allison.  And thank you to everyone who played along!

Hey y’all !  Today is our day on the Abstract Garden Blog Hop and we couldn’t be more thrilled that Benartex Fabrics and designer, Christa Watson asked us to join in on the fun! To find out more about the Abstract Garden Blog Hop and Christa’s inspiration behind this fab fabric collection, check out Benartex’s Sew in Love (with Fabric) blog and Christa’s blog here!

AG BundlePattern Giveaway
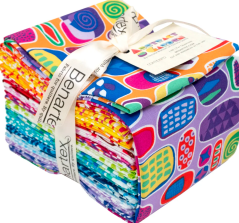
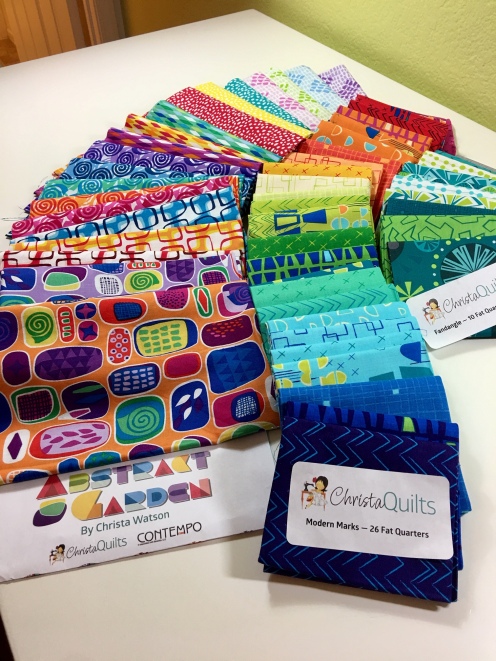
We’re one of the last stops on the hop so first let me say – there are giveaways!!! Yippee!  Christa and the nice folks at Benartex are giving away an Abstract Garden Fat Quarter Bundle and we here at Colourwerx are also throwing in a pattern pack of the three patterns we used when making the projects you see here: ModCat, Mini ModDog & Disco.

Here’s how the giveaway works: Just leave a comment below and we’ll select a winner Saturday morning.  It’s that easy!   Back to the hop….

Abstract Garden is the new signature collection of designer extraordinaire and Colourwerx good friend, Christa Watson of Christa Quilts.    The collection is super modern, fab, fun and bright – just my cup of tea!  Last year, when Christa mentioned that her Abstract Garden Fabric Collection was coming out soon, I jumped at the chance to make her a few projects to display in her booth at the Fall Quilt Market. Here’s a picture of the finished projects…

Christa_Projects

Christa is also always so generous with her fabric!  Here’s the assortment of fabulous fabrics Christa sent out to me.  Check out the #colouricious tones and those fabulous mid-mod designs (can I get a ooooo and an ahhhhhh please!), ….not only did Christa send me  fat quarters of the entire collection of Abstract Garden, but she also included some fabrics from her first 2 collections, Modern Marks and Fandangle – and yes, I do have big plans for these other fabrics soon! 🙂

AG Fabric

Now – what projects to make for Christa??  Well that was easy – what could be better than a ModCat and Mini ModDog out of Christa’s super modern fabrics!!

I made the ModCat trio first – this is the wallhanging version of our popular ModCat pattern.  First I needed to divide the fabrics she sent me into three colorways – I decided to make a yellow/orange, blue/aqua, and purple/pink cat.  After wonky strip piecing the fabrics together, I cut out the cat shapes and then appliqued stitched around the cat eyes before fusing everything to the background fabric.   Hint – hint!: By stitching around the cat eyes first, I have more control over my stitching and it’s easier to control the zigzag around the smaller shapes.

I had a lot of scraps left over so next I made (2) Mini ModDog pillows for her booth – these are always so much fun and work up quickly – I made Christa a girl and a boy dog pillow!!.  Again first I machine quilted the background, then wonky strip pieced the the fabrics together, cut out the shapes and appliqued stitched the pups to their fabrics.  These came out super cute if I do say so myself!

Finally, I worked up for Christa my Disco pattern in her new collection. I placed this version of Disco on the back of my pattern cover!    I just love it!

Disco_Abstract Garden copy

Also on today’s blog hop are Tara and Stephanie – check out their links below and hop on over to their blogs!   And be sure to check out Benartex’s blog tomorrow where they’ll present a virtual trunk show of Christa’s Abstract Garden quilts.  Here’s the full list of my fellow bloggers and the quick links to their blogs ….Abstract Garden Fabrics

Monday 
Benartex Blog – Intro & inspiration about my designs

Tuesday
Sherry Shish from Powered by Quilting
Lee Monroe from May Chappell

Wednesday
Annie Unrein from Patterns by Annie
Pam and Lynn from The Stitch TV Show

Thursday

Friday

Finally – go ahead and leave a comment below to enter our giveaway!  Molly the Beagle – office manager in charge – will randomly select a winner on Saturday morning! 

And be sure to ask your local quilt shops if they have Abstract Garden.  If not, check out Christa’s online shop to order some of these great fabrics for your stash!

Happy quilting and until your next colour fix~Linda & Carl


LongArm Quilting Workbook by Teresa Silva

LQW Book Cover

Welcome to the second to last stop on the LongArm Quilting Workbook blog hop!

It’s no big secret that Carl and I are huge fans of Teresa Silva (aka Quilting is my Bliss) and her gorgeous custom Teresa Silva~Quilting is my Bliss
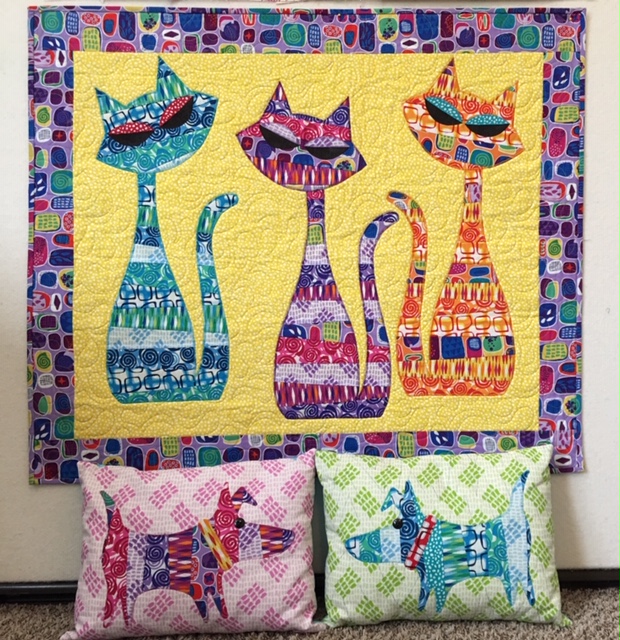
machine quilting.  In the 2 short years we’ve had the pleasure of working with Teresa, she has long arm quilted over two dozen quilts for us and all have been perfection!  Imho – Teresa is simply one of ‘the best’ custom quilters ever!…..Her intuitive nature consistently shines through on every project – picking just the right pattern to compliment the quilt mixed with  gorgeous threads and then topped off with that exquisite workmanship – all together creating stunning results every time without ever overpowering the overall quilt or fabrics.  And would you believe in all this time and through all those quilts – she, Carl and I have never met face to face (gasp!)…but all that will change soon when we meet up this month at the Houston Quilt Market – she’ll be there to promote her newest creation – the just published and fantastic read – “Longarm Quilting Workbook” from F&W Media – now available on her website or at Amazon.com.

First off – I love the fact that the book is spiral bound so you can easily lay it flat near your work surface or your sewing machine.

LongArm Quilting Workbook Spiral

Secondly – it’s chocked full of detailed instruction with lots and lots of diagrams and pictures – there are over 20 plus quilting exercises explaining  in detail how to do all those super cool designs we all know and love –  like curly circles, pebbles, ribbon candy and feathers –  (gah! -Teresa’s feathers are to die for (see our Dazzle Dragonfly quilt pictured below and you’ll see what I mean).

Book Inside-LongArm Quilting Workbook

Exercises are fine but how about applying these to a block or a whole quilt,  you say?  Well – yes she thought of that too – I really appreciated Chapter 3 – Doodling and Drawing – this chapter explains in detail  how to diagram, map out on paper and then translate to your machine a combination of quilting designs together on a whole cloth (which could be easily adapted to your own quilt or a singular centered block in your quilt).  Let’s take a peek…

Book Inside - LongArm Quilting Workbook

And if that wasn’t enough, the Gallery of Quilts is stunning eye candy!  Page after page of beautiful quilts with close ups of her free motion quilting! This is Julie Herman’s Jaybird Designs quilt “Sweet Tooth”. Check out all of that gorgeous quilting!

Sweet Tooth-Longarm Quilting Workbook

Image Courtesy of F&W Media

And don’t let that title fool you – the information and exercises in the book are completely applicable to domestic machines as well.  I am admittedly the ‘world’s worst free motion machine quilter’ (that’s why I send everything to Teresa!) so anytime I find a new gadget, book or notion to help I am all in – I found her exercises well written and super easy to follow. Now I just need to find the time to practice!

Next let’s show off some of Teresa’s custom free motion quilting on our Colourwerx quilts – prepare yourself for gorgeousness!  First off , this recently completed version of ModTV (CW-110) using Alison Glass’ Chroma…..

ModTV3

And how about this stunning pebbling and clamshell work on our Cosmos quilt (CW101) –  this was the first quilt she custom quilted for us and is still one of my favorites!

Close up Cosmos

And another fave – “Harlequin” – a commissioned piece using Kaffe Fassett’s Artisan collection for Free Spirit Fabrics that we designed and made,  and Teresa custom quilted. One picture was simply not enough – click on any pictures to enlarge and see her quilting up close!

And her work on our Splendor quilt (CW-108) was fabulous…. (quilting in and around applique I think is the hardest for most custom quilters but Teresa has it down to perfection…   🙂 )
Splendor

And lastly – our Dazzle dragonfly (CW-102) oh my! –  and that gorgeous,  enormous feather – ooo and ahhhh indeed!

Dazzle Full Size

Teresa also has fun giveaways planned for you, but you have to go visit her blog at quiltingismybliss.com tomorrow, October 17th through October 20th and leave a comment to enter the giveaway!   Here are the prizes – yippee!grand-prize-1-blog-hop.jpg

The Grand Prize from the blog hop will be:
Free Spirit Fabric – Tula Pink Spirit Animal Fat Quarter Bundle
Quilter’s Dream 80/20 Queen Size Batting
Superior Threads – So Fine 50 – 2 Cones of Thread
20 x 20 Wholecloth Quilt – Made by Teresa Silva
Longarm Quilting Workbook – Autographed

Second Prize from the blog hop will be:grand-prize-2-blog-hop.jpg
United Notions/Moda Fabrics – Fig Tree solid Fat Quarter Bundle
Quilter’s Dream Pink Twin Size Batting
Superior Threads – So Fine 50 – 1 Cone of Thread
Longarm Quilting Workbook – Autographed

Carl and I are thrilled for her and wish Teresa the best of all successes with her wonderful “Longarm Quilting Workbook” – now go forth, buy her book, leave a comment on her blog to enter the giveaway,  practice your free motion and have fun!

Until your next colour fix~Linda & Carl

…Just exactly what do you guys do?…

IMG_6104For the trade only – Quilt Market happens just twice a year and it is ‘the place’ to preview the newest fabrics, patterns and notions that will be arriving at your local quilt shop in the coming year.

Like most Quilt Markets it was exhausting but very energizing….  The ‘exhausting’ is in the designing, making and preparing all of our quilts for display, coming up with a new look for our Colourwerx booth (see below for a couple of snaps) , designing and printing handouts and brochures, and the final step – hoping that it all arrives (including us and the quilts) in one piece to the venue and on time.

The ‘energizing’ is actually just being there – being able to view and or try out the latest fabrics, notions and patterns, seeing a vast variety of quilts all made with different techniques and styles, and lastly and most importantly catching up with friends and colleagues and meeting new ones. Here were a few of our favorites:

IMG_6046

Amy Butler’s Booth

IMG_6045

Sew Many Creations’ Booth

IMG_6059

Tula Pink’s Booth

We were also thrilled to see several of our ‘secret sewing’ designs hanging in the Free Spirit Fabric booth and Quilt Gallery.  ‘Secret sewing’ – meaning we were not able to reveal them to you until now because the fabric had not yet been released.

Which brings me to this important note:  We get asked alot “….just exactly what do you guys do….”  – well, aside from the obvious fact that we sell patterns for our original designs and make quilts (and we make alot of them!), we also design quilt patterns and make quilts for many well known fabric companies.  Hence, the term “secret sewing”.

For example, a new fabric collection is due to be released in the next 6-9 months but the fabric designer may be a well known painter or illustrator and know very little about quiltmaking…so that’s where we step in….we are contracted by the fabric company to take the fabric collection and design several patterns highlighting that collection…then we are asked to develop one or several of these designs further by writing a pattern and actually making the quilt for display – it is great fun but it is also ‘top secret stuff’ as we can’t reveal to you what we are up to until the collection is released.

Back to Spring Quilt Market, we designed and made five quilts that were on display at Spring Quilt Market, and these were fairly “top secret” until about 2 weeks prior to Spring Quilt Market.  Some of these designs had been in the works since January so it was mighty hard not to tell you what we were up to….

We’ll highlight these designs later but here’s a short preview of them hanging in the Free Spirit Fabric Gallery of Quilts.  And we must give credit to our dear friend Teresa at Quilting is my Bliss – she custom  quilted all of these and did just an absolutely fantastic job!  If you see a quilt you like, then jump on over to the Inspiration page on the the Free Spirit website to download the free pattern  – some of these are available now and some are coming in a few weeks or so, plus there are loads more free patterns there by other fellow designers that are super terrific, so check it out!

IMG_6081

Mystic Gold

IMG_6071

Hat Boxes

IMG_6067

All Stacked Up

IMG_6064

Easy Sunday

IMG_6060

Racetrack

And finally –  Colourwerx (meaning Carl and I)  designed and debuted three new patterns which are now available at your local quilt shops – they are also available for purchase on our website!   PDF versions of these are in the works and should be available by the end of June!  (drum roll….) They are: ModCats, Mod TV and Mix It Up!  All are super fun patterns and incorporate the slash ‘n sew method we love!

All in all, a great time was had by all and now we’re turning our thoughts towards the Houston Quilt Market in October (yes, October already!)

Thank you to all for following along with us, and until your next colour fix~
Linda & Carl

The “Tattooed” Mini Spikey & ModDog

Early February,  we had the honor of creating a mini version of our “Spikey” quilt for our andoverfriends over at Andover Fabrics using Canadian artist and fabric designer, Libs Elliott’s,  newest collection called “Tattooed”.  The quilts commissioned were to be hung in the Andover Booth at the QuiltCon East Convention that took place in Savannah, GA.  We were beyond excited and thrilled to meet the challenge.

IMG_4851“Tattooed” fabric is just starting to hit your local quilt shops, and if you haven’t seen it yet – go check it out….It is a gorgeous collection of richly saturated jewel toned prints and makes the most perfect rainbow quilt or added to your stash is a great basic. You can also check out more of Libs Elliott’s quilts and her designs at her website …..her work is really innovative and fabulous as she uses computer code to create her designs.IMG_5008

Back to the mini “Spikey” – first I needed to arrange the “Tattooed” fabrics in my preferred color order.  Additionally, because we had a size requirement, I needed to reduce the Spikey triangle template to 3″ in length (instead of the original 8″ length).  These were going to be some tiny triangles!  The background and borders were cut from Andover fabrics Chambray collection – this is a beautiful woven fabric that creates texture, depth and movement to the background.  Love it and I absolutely need more now!

I then began the task of sewing triangles together…With our Spikey pattern the key to matching the triangles up is to offset the 2 triangles by just about 1/8″ and sew a perfect (not scant) 1/4″ seam – before I set out to sew any “Spikey” quilt I always have to do several test runs until I get it just right and then I set that pair of triangles off to the side as my reference while sewing all of the others. (Click on the photos to enlarge).

Once done – the mini Spikey was ready for quilting…since I don’t consider myself the most expert machine quilter, I used a monfilament thread and simply quilted a 1/4″ away from all of the spikes and then quilted abritrary lines in and out through the outer borders….Sometimes simple is better….and Voila – done! (You can click on the photos below to enlarge 😉

So off it shipped to be placed in the Andover Fabric quilt gallery.  What a thrill to see our mini Spikey displayed with all of the other gorgeous quilts in the Andover Fabric booth at Quilt Con East….I love the eyeball pillow and the jewel quilt, don’t you? it was thrilling to see it displayed with all of the other gorgeous work.

While making the mini Spikey, we also toyed around with making an additional project from the “Tattooed” fabric  – a mini “ModDog! He, alas, did not make the cut….oh well…

dog pillowBut here are the results!   I first wonky slashed ‘n sewed some “Tattooed” strips together and cut out the dog body.  Then I textured the Chambray background with straight stitching lines using a collection of brightly colored 12 weight Aurifil threads – these are deliciously weighty threads and work perfectly through my Bernina sewing machine using a 90/14 size topstitch needle….no problem!  And I love the way the background looks!  Next, I appliqued around the dog with a 50 weight Aurifil thread, added a piece of gorgeous Renaissance Ribbon for a collar, and even fussy-cut  a “handmade tat”  from Libs’ previous collection “True Love” for his rear end – ha! I think he came out super cute and we’re plotting more of these in the future!

Many thanks to Giusseppe and Daryl at Andover Fabrics for the opportunity and to Libs Elliot for designing such a gorgeous collection.  And if you like our “Spikey quilt or “ModDog” pillow, you can purchase patterns for the larger versions from our Colourwerx website or a PDF download from our Colourwerx Craftsy site.

Until your next colour fix~
Linda & Carl