Welcome back to the last and final week of our All Stacked Up QuiltAlong! This is the week where we put it all together – albeit some of you may have already finished your quilt top because quite frankly, once you’ve pieced the blocks in Week #2 it’s really hard not to just wanna finish off the top right away!
Here is this week’s companion video for you – enjoy!!
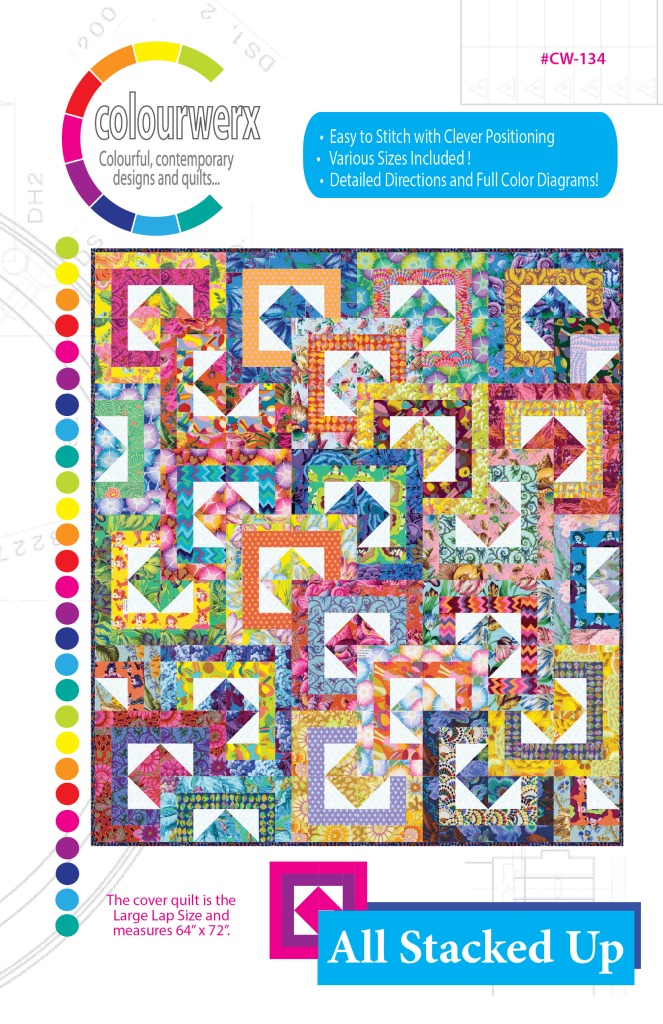
So by now all of your blocks should be pieced and complete – you should have (3) identical blocks from each individual pair of fabrics.
If you’re just hopping into the QuiltAlong, you might want to review the previous week’s posts right here:
Lay Out Blocks According to the Quilt Top Diagram — Once all of your blocks are pieced, you are ready to lay out the blocks according to one of the quilt top diagrams included in the pattern on pages 6-10…..and begin to stitch blocks together to form rows… and stitch rows together to complete the quilt top.
Let me take a moment to explain the diagrams you see there. Each set of (3) identical blocks has a number – if you kept pairs of fabrics together during the cutting and piecing parts of the project, you would end up with (3) identical blocks of for example, Fabric A & Fabric B …..and (3) additional blocks of Fabric A & Fabric B that are the mirror image of the first three (meaning the positions of Fabric A & Fabric B are reversed in the second set of three identical blocks).
So when looking at for example, the Baby Quilt Size diagram on page 6, you’ll see that the #1 & #2 block sets are the mirrored image of each other. It was just our way when writing the pattern to give you a little extra help for color disbursement and laying out block combinations.
Here’s what my top looks like when laid out on the design board. Again I’m using Shayla Wolf’s from Sassafras Lane Designs newest collection called “Favorite Things”.
Be sure to check back next week here on the Colourwerx Blog and on Instagram to see my finished ‘All Stacked Up’ quilt and to take part in the “Favorite Things” Instagram tour – Shayla and Windham Fabrics will be giving away fat quarter bundles of the ‘Favorite Things’ collection too! Woo Hoo!
This concludes out All Stacked Up QuiltAlong – I hope you enjoyed it!
Thank you so much for following along and for your continued support! Look for more Colourwerx QuiltAlongs on our Colourwerx Facebook page or on our website under QuiltAlongs!
Until your next colour fix – happy quilting! Linda & Carl xxoo
COMPANION VIDEO – Each week of the quiltalong, I always post a companion video and this week is no exception….If you’d like to view this week’s companion video to Week #2 of the All Stacked Up QAL, view it here:
Set Your Machine Up for Success — Before we start the piecing fun, I always think it a good idea to set your sewing machine up for stitching success.
Here are few things I always do when starting a new project that requires precision piecing: • Lift the stitchplate and clean out all of those dust bunnies; • Change the needle to a new needle – I prefer the Schmetz 75/11 Quilting Needles for precision piecing; • Thread your machine with a neutral colored 100% cotton , 50 weight thread – my go-to color and thread is #2615 from Aurifil Thread;
• And most importantly, have a good idea of how to stitch a scant 1/4″ seam…
What’s a Scant 1/4″ Seam You Say?? — A scant 1/4″ seam is a hair less than a full 1/4″ seam.
Many machine manufactuers 1/4″ presser feet are FULL 1/4″ seams . In order to sew accurate 1/4″ seams and have our precision pieced blocks turn out to exactly the finished size they need to, we need to stitch scant 1/4″ seams.
If you’ve ever been frustrated by achieving the perfect seam allowance for quilting then I think I have the perfect little tool for you….it’s the Perkins Perfect Piecing Seam Guide and it works like a dream.
Available at most quilt shops and through Amazon, this little ruler is genius! It is quite simple – it has a hole in the middle and a line that runs end to end of the ruler and through the middle of the hole. The line designates a scant 1/4″ seam allowance.
You place the ruler under your presser foot, drop your needle down into the hole and lower your presser foot on to the ruler. You can now clearly see where you need to line up the fabric edge of your units to achieve a scant 1/4″ seam. Look closely!! – more than likely, it will not be lined up with the edge of your 1/4″ presser foot, but rather just under the edge of the foot and a little bit to the left. Once you study this, you can run a piece of painter’s tape or washi tape along the edge of the Perkins Piecing Guide to mark the stitch plate of your machine for scant 1/4″ precision perfect seam piecing! You are ready to go !
Just a Final Thought on Fabric Pairings — I know the All Stacked Up pattern says that once you pair fabrics together, they should remain paired together through block piecing, etc….etc…etc…
But really, do they?? Once all of your fabrics are precut and paired up, you do have one final opportunity before piecing to mix up or revise your fabric pairings.
Here’s an example: my first pairing for these fabrics was mixing the green (Fabric A) with the yellow (Fabric B).
But after looking at all of my fabrics, I decided I wanted to mix up the pairings. Now I know from reading the pattern on page 3, that I need (X) amount of units in Fabric A paired with (X) amount of units in Fabric B to make (3) identical blocks. So looking at the pairing on the right side if I wanted to trade out my smaller green Fabric A units for let’s say some smaller lime green Fabric A units, I could! I can mix and match all day – as long as I have the total units for Fabric A and the total units for Fabric B paired in each grouping as specified on page 3 of the pattern.
Let’s take another look at fabric pairings…..here are my first pairings. You can see I’ve got magenta with yellow, green with orange, blue with salmon and so on….
After I precut my fabrics, I revised some of my combinations to create a more color wheel order for the quilt blocks and ended up with these fabric pairings that I like a lot better. In the end, none of my original pairs stayed together and in fact each pair is a completely different combination of fabrics than the other.
So yes, before you start piecing, take a moment to review your fabric pairings ….if you want to switch fabrics from pairing to pairing, heck yes – go ahead ! Just double check that you have the total units needed in the final pairings to make 3 identical blocks.
Piecing the Block — Referring to the directions in the All Stacked Up pattern on pages 3-4, start by making half square triangles. Add (2) Background Fabric squares to each fabric pairing. Place the square Background Fabrics with the square Fabric A units and make Half Square Triangles – (4) squares in will yield (4) half square triangles out.
Use your square ruler and line up the diagonal line of the ruler on top of the diagonal line of the half square triangle unit to trim and square down each square to the appropriate size.
Discard (1) of the units as you will only need (3) half square triangles for the project.
Piecing the block couldn’t be more simple and chain piecing the (3) individual blocks makes this step go even faster! So go forth and piece all of your fabric pairing to create (3) identical blocks from each fabric pairing following the instructions on pages 3-4 in the All Stacked Up pattern!
That is it for Week #2! I’ll be back next week for Week #3 – our final week- where we’ll be piecing the quilt top together!
Thank you for following along and until then, happy colouricious quilting! L&C xxoo
Hello! And welcome to the ‘first week’ of our seventh Colourwerx QAL (quilt along) where we’ll be making our super fabulous and oh – so – easy “All Stacked Up”.This is a super fun quilt to make, is a great stash buster and is also very easy to piece. It’s a great way to start the new year!
JOIN THE COLOURWERX FACEBOOK GROUP: First, I want to thank you so much for joining us here. If you want to meet with other Colourwerx quilty friends and aren’t yet a member of our Facebook group, I invite you to join our free QAL Facebook group where you can ask questions, share your progress and of course, post pictures of your finished projects so everyone can share in the fun! Also feel free to share this invite and any other QAL news with quilty buddies and invite them to join along in the fun!
COMPANION VIDEOS: Each week of the quiltalong, also look for a companion video to be posted within the blog post like this one below. If you’d like to receive alerts to when the videos are posted and other neat tutorials and replays of our Fab Friday Live broadcasts, then subscribe to our Colourwerx YouTube channel right here!
If you’d like to view this week’s companion video to Week #1 of the All Stacked Up QAL, view it here:
So this is Week#1 of the All Stacked Up QAL – First let’s review our super fast 3-week schedule! • Week 1 (this week) we’ll gather our fabrics and precut….. • Week 2 is all about piecing the blocks….. • And Week 3 we’ll be putting it all together.
Week #1 – GATHER YOUR PATTERN & MATERIALS — Here’s what you’ll need to join in on the stitchin’ fun – • The All Stacked Up Pattern!
WHICH SIZE WILL YOU MAKE?? Once you get the pattern home, check out the back cover and determine which size All Stacked Up you’d like to make. There are five sizes to choose from: Baby through King Size. You’ll also see on the back cover under each size the number of fabrics you’ll need to gather – look under the row heading “Block Fabrics”.
I’ll be making the Baby Size quilt along with you, so if you look under the Baby Size for example, it says for the Baby Size needs a total of (12) Block Fabrics – 1/3 yard cuts of each fabric (or 12″ x WOF).
Now you can also use Fat Quarters or 6″ Design Strips instead of the 1/3 yard cuts. You’ll need the same amount of fabrics listed under the row heading “Block Fabrics”. So for example, the Baby Size version requires (12) fabrics so you would need either (12) Fat Quarters or (12) 6″ x WOF design strips. (Take note!! The pattern does not provide a cutting diagram for Fat Quarters or 6″ Design Strips so if you do use them instead of 1/3 yard cuts, just plan out on paper ahead of cutting the total units that need to be cut (found under the “If using 1/3 yard cuts” on page 1-2) before you cut your fabric!)
Another option is to make a scrappy version (like you see here and like what is pictured on the front cover). This is the ultimate stash buster! Refer again to the back cover of the pattern and look under the paragraph: “For a More Scrappy Look”. In a nutshell – simply select which size quilt you’d like to make, then look to how many fabrics you will need to gather under “Block Fabrics” and then double the number. Taking the example of the Baby Size again, if I wanted to make a scrappy version, I see that (12) fabrics are needed….I would double that number and need to gather (24) fabrics total, in 1/4 yard and 1/8 yard cuts. I would gather (12) 1/4 yard cuts and (12) 1/8 yard cuts.
HOW MANY BLOCKS WILL EACH FABRIC COMBINATION MAKE ?? The All Stacked Up quilt is based on pairing up fabrics and each pair of fabrics will yield 1-2 ‘blocks.’ For clarification, each ‘block’ is comprised of (3) smaller identical quadrants.
If you are using 1/3 yard cuts, Fat Quarters or 6″ Design Strips, each pair of fabrics will yield (2) complete ‘blocks’ – one ‘block’ will be the mirrored image of the other.
If you are using 1/4 yard and 1/8 yard cuts (for a more scrappy look), one 1/4 yard cut plus 1/8 yard cut pairing will yield only (1) ‘block’ or (3) identical quadrants – hence why you need to double the fabrics listed for a more scrappy look.
PLAN COLOR PLACEMENT — If you’d like to preplan color placement, you can download the Small Lap or Large Lap black & white line art diagrams from the links below.
Sometimes this really helps with color placement and also pairing of fabrics. I’ll be using a beautiful new collection of fat quarters from a new fabric collection called “Favorite Things” designed by our friend, Shayla Wolf of Sassafras Lane Designs.
Here’s an example of my colored-in Baby Size diagram using the fabrics above. I just mimicked the fabric colors and colored in the diagram so I could pair up my colors and also evenly disburse the colors across the quilt for value and balance. Now I have a plan!! The links are below if you want to download the B&W line art and do what I did!
PAIR UP FABRICS & PRECUT – Once you’ve gathered your fabrics and perhaps decided on color placement with the diagram above, it’s time to pair up your fabrics. Pair up the fabrics according to the chart below and keep the pairs together as you begin to precut and for piecing in Week #2.
Here’s how I paired up my ‘Favorite Things’ Fat Quarters after working out the color placement.
Now you are ready to precut your fabrics!! Again keeping pairs together, precut each pair of fabrics referring to the precut directions on pages 1-2. (Again if using Fat Quarters or 6″ Design Strips plan out on paper the total units that need to be cut (found under the “If using 1/3 yard cuts” on pages 1-2) before you cut your fabric!)
Once all of your fabrics plus the background yardage is precut, you are done and ready to go for Week #2!
That’s it for Week #1 – that was fun! And I can’t wait to see all of your fabric selections! Week #2 we will begin to piece all of the blocks together!Until then, please be sure to email us at colourwerx@yahoo.com if you have any questions. Or feel free to post questions or progress pictures on our Colourwerx QAL Facebook Group.
Until your next colour fix and next week’s QAL post ~ happy and bright quilting always!