Designer Tips & Techniques Facebook Live Event

UPDATED as of 6/2/20!  This event has been rescheduled to a future date!  I will let you know the new dates when I know!  Thank you!


************************************Designer Tips Badge Square

I am so excited to have you join me  for the 2nd installment of the Designer’s Tips and Techniques Live Facebook Party – this is a three day event, June 2nd, 3rd & 4th, from 12pm to 8pm EST.  Each designer listed below will present a 15 minute live presentation on her Facebook page at the top of each hour, demonstrating their favorite technique or showing some of her favorite tips and tricks.

You can see  the full schedule of Designers below.

Yours truly (that would be Carl and I here at Colourwerx) are scheduled for Thursday, June 4th at 5pm Eastern Standard Time (2pm Pacific Coast Time).  You can view our demo live on our Colourwerx Facebook Page.  I’ll be demoing my favorite slash ‘n sew technique and show you how to make these mod and liberated Colourstruck pillows! So tune and enjoy!  🙂  

SlashnSew_Pillow_Image copy

Tuesday, June 2 (all times are Eastern Standard Time)

12:00 Marija Vujcic   https://www.facebook.com/MaraQuiltDesigns/

1:00   Becca Fenstermaker   https://facebook.com/prettypiney

2:00   Debbie Wendt https://www.facebook.com/Wendt-Quilting-280123925340667/

3:00   Jo Westfoot     http://www.facebook.com/thecraftynomad

4:00   Lisa Ruble        https://www.facebook.com/LoveToColorMyWorld/

5:00   Marlene Oddie            http://www.facebook.com/kissedquilts

6:00   Reed Johnson  https://www.facebook.com/BlueBearQuilts/

7:00   Cherry Guidry  https://www.facebook.com/CherryBlossomsQuiltingStudio/

8:00   Ebony Love      https://facebook.com/lovebugstudios

***********

Wednesday, June 3 (all times are Eastern Standard Time)

12:00 Tina Dillard     https://www.facebook.com/quiltingaffectiondesigns

1:00   Annie Unrein   https://www.facebook.com/patternsbyannie/

3:00   Patti Carey      https://www.facebook.com/Pattis-Patchwork-464368707643825/

4:00   Sarah Maxwell https://www.facebook.com/DesignsSarahJMaxwell

5:00   Andi Stanfield  http://www.facebook.com/Anditruebluequilts

6:00   Laura Piland    https://www.facebook.com/sliceofpiquilts

7:00   Tammy Silvers https://www.facebook.com/tamarinis

8:00   Terri Vanden Bosch     https://www.facebook.com/lizardcreekquilting/

***********

Thursday, June 4 (all times are Eastern Standard Time)

12:00 Toni Smith       https://www.facebook.com/Quiltoni/

1:00   Kate Colleran  https://www.facebook.com/SeamsLikeaDreamQuilts/

2:00   Marcea Owen https://www.facebook.com/cottonstreetcommons/

3:00   Epida Studio    https://www.facebook.com/epidastudio/

4:00   Geeky Bobbin  http://facebook.com/geekybobbin

5:00   Linda Sullivan  https://www.facebook.com/colourwerx  (This is ME!)

6:00   Kimie Tanner and Missy Winona        https://www.facebook.com/onwilliamsstreet

7:00   Simone Fisher https://www.facebook.com/SimoneQuilts

8:00   Swan Sheridan http://www.facebook.com/swanamitystudios


ModTV QAL: Week #2 – Piece the TV & Legs

ModTV_CW110_FRONTWelcome back!   It’s Week #2 of our ModTV QuiltAlong! !  This week we’ll be ‘slashin’ and sewin’ the TV Set and the TV leg units, so get ready to throw out everything you learned about exact cutting and piecing and get ready for some cut loose, liberated fun!

But first — If you’re just joining us this week, be sure to review Week #1’s Blog Post to find out how to purchase the pattern and what fabrics and materials you’ll need to gather –

READ THE MODTV QAL WEEK #1 POST BY CLICKING HERE

Also, just a friendly reminder!   If you want to join with other quilty friends and aren’t yet a member of our Facebook group, I invite you to join our free QAL Facebook group where you can ask questions, share your progress and of course, post pictures of your finished projects so everyone can share in the fun!  Also feel free to share this invite and any other QAL news with quilty buddies and invite them to join along in the fun!

You can also subscribe to our Colourwerx You Tube channel right here!

JOIN THE COLOURWERX QAL FACEBOOK GROUP HERE
SUBSCRIBE TO THE COLOURWERX YOU TUBE CHANNEL RIGHT HERE

Linda_Week 2
IMG_1003
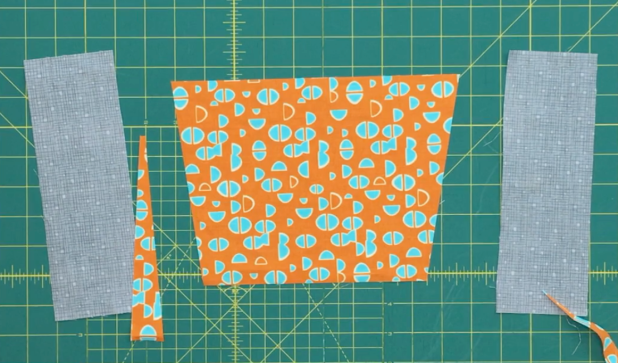
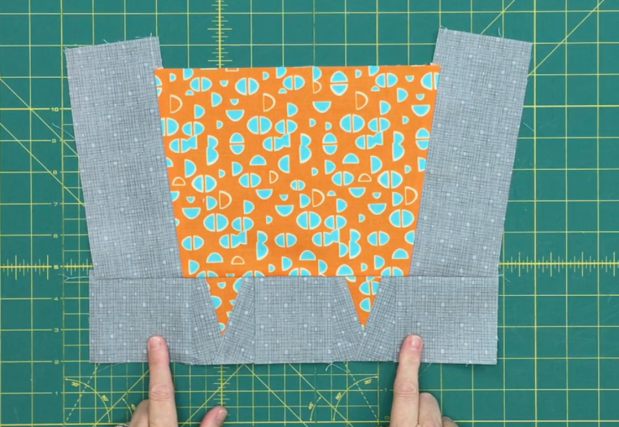
I love ‘slash ‘n sew’ piecing!  It’s liberating, easy to do and best of all you don’t need to have an exact or even perfect 1/4″ seam or be that careful at cutting.  The whole idea is to get wonky.  And quite frankly, it’s that ‘wonkiness’ that gives these little retro TV’s their personality! So let’s get started!

Be on the lookout for Week #2’s companion video as well! 


Organize Your Fabric Pieces —
The TV block which finishes at 12″ x 12″ is made up of three separate units:  The TV, the Leg Unit and the the Antenna Unit.  First things first – you should have already precut your pieces for at least (1) ModTV Block in Week #1.  if not, refer back to pages 1 & 2 of the ModTV pattern to find the cutting directions and dimensions.

Separate all the cut pieces into the three groups. Refer to the pattern near the beginning of each section (i.e.: page 3 – Part One – Stitch the TV Set Unit), and you will find exactly which pieces from your TV fabric and your background fabrics should be placed in that grouping.

Here are the groups…..the TV….

Group 1

The Legs….

Group 2

….and The Antenna….

Group 3

Stitch the TV Unit —
Turn to page 2 in the ModTV pattern.  Place the TV rectangle and Background (B/G) rectangles on the cutting board.

Group 1

Slash up the sides like so (or refer to Fig 2 in the pattern). The key here is to slash at an ‘upward and outward’ angle to create a wonky shaped rectangle, and to try to slash each TV block you make slightly different.  But be careful not to slash too wide of a strip off or the TV will not finish at the right size (it may be too small when you complete piecing it).  I usually end up slashing about 1-1/2″ width near the bottom to about 3/4″ -1/2″ width at the top.  You can mark these measurements on the sides of your TV rectangle to guide you until you get more confident to “slash” without marking. 

Cuttting 1

Cutting 2

Next – super simple!  Just flip the B/G rectangles over onto the edge of the slashed TV set edges.  Place them Right Sides Together on the TV set and stitch – you don’t even need to do a perfect 1/4″ seam here – just place your presser foot along the slashed edge and stitch.

Press the B/G rectangles outward and then place your ruler along the bottom and edge and trim the bottom edge of the TV unit even.  Set aside.  Not so bad right?!?

Tv 4

Stitch the Legs Unit  —
Turn to page 3 in the ModTV pattern and gather all of the pieces needed to make your TV Leg unit.   First, as stated at the top of page 3, be sure to cut in half the (2) 3-1/2″ squares to make (4) 1-3/4″ X 3-1/2″ rectangles – these will be the B/G rectangles that will be stitched on to either side of your leg pieces.

SUPER BIG HINT! I like to lay all of the pieces out on my cutting board like so.  As I stitch these leg units together I do not disturb what is on my cutting board.  When I take 2 pieces and stitch them together, I return them to their exact positions on the cutting board so as not to confuse myself about which pieces go where.

Legs 1

First fold the leg units in half lengthwise to create a center crease. Return to position.

Starting with the right leg, flip the B/G rectangle on the right side over and angle it from the bottom right corner to the center top edge of the leg unit like so (the center crease on the leg unit will guide you).

Legs 2

Stitch down the edge of the angled B/G rectangle and trim the any excess fabric away to reduce the bulk  leaving a 1/4″ seam allowance. Press the B/G rectangle outward.

Return the right leg unit back in position and flip the  B/G rectangle on the left side over and angle it from the bottom left corner to the center top edge of the leg unit like so.  Make sure that top edges of the B/G rectangles are overlapping each other at the top.  

Stitch down the edge of the angled B/G rectangle and trim the any excess fabric away to reduce the bulk  leaving a 1/4″ seam allowance. Press the B/G rectangle outward. Your leg unit should somewhat resemble the below photo. The leg unit will need to be trimmed and squared down.  Before trimming the unit,  I want to make sure my leg unit is centered so I draw (or crease) a line down the center of the leg.

Legs 5a

Lining the pointy edge of the leg unit on the 1-1/4″ mark (which centers the leg unit under what will be the trimmed 2-1/2″ wide x 3″ long rectangle), trim the unit (refer to Fig 6-7 in the ModTv Pattern).   Repeat on the left leg to make one  pair of legs. (If for some reason, your leg unit is just “shy” (or smaller) than this, don’t worry  – just trim it as close to that measurement as possible.  When we complete the whole block, we will be trimming the block down to a final size and there will be extra fabric to trim away). 🙂

IMG_1116


Again return the Leg units in position on the cutting board and sew the (5) pieces together to create the Leg Unit Strip. Press the seams according to Fig 8 in the ModTV Pattern.

Legs 5

Sew this Leg unit to the bottom of your TV unit!

Tv Legs 3

That’s it for Week #2!!  Next week – Week #3 we’ll begin slashing and sewing our TV Antenna Unit together and making the Color Bar Blocks – woohoo!

Until then, please be sure to email us at colourwerx@yahoo.com if you have any questions.  Or feel free to post questions or progress pictures on our Colourwerx QAL Facebook Group.

Until your next colour fix and next week’s QAL post ~  happy and bright quilting always!    L&C xxoo


ModTV QAL: Week #1 – Gather the Pattern and Materials plus Precut for One Block

Hello!  And welcome to the ‘first week’ of our fourth Colourwerx QAL (quilt along) where ModTV_CW110_FRONTwe’ll be making our super fun ModTV block (and or quilt)!

First, I want to thank you so much for joining us here and on our Facebook Colourwerx QuiltAlong Page.  Whether you’ll be sewing up the pattern along side us or just observing from afar, we welcome you and are overwhelmed by your enthusiasm so far – so thank you, thank you, thank you!

Also, if you want to meet with other Colourwerx quilty friends and aren’t yet a member of our Facebook group, I  invite you to join our free QAL Facebook group where you can ask questions, share your progress and of course, post pictures of your finished projects so everyone can share in the fun!  Also feel free to share this invite and any other QAL news with quilty buddies and invite them to join along in the fun!

JOIN THE COLOURWERX QAL FACEBOOK GROUP HERE

Screen Shot 2020-04-27 at 11.23.01 AM

Look for a companion video to be posted in a few days!  If you’d like to receive alerts to when the videos are posted and other neat tutorials, then subscribe to our Colourwerx UTube channel right here!

You can watch our ModTV Intro Video by clicking here!

So this is Week#1 of the ModTV QAL –  First let’s review the schedule!

ModTV Slug

As you can see it’s a 4-week QAL this time, but please know that you can take it at your own pace and join in anytime.  All of the videos and blog posts will remain here, as well as be posted on our website and social media pages throughout the year.  My quilt alongs are always  free to join and I’ll be making a 12″ TV block along with you over the next 4 weeks.  I’ll also show you other ModTV quilts I have made and ways you can personalize your ModTV block by changing out the TV screen shape to a licensed fabric or a fabric photo.  But first things first….

GATHER YOUR PATTERN & MATERIALS —ModTV_CW110_FRONT
Here’s what you’ll need to join in on the stitchin’ fun –
• The ModTV pattern by Colourwerx – and great news? – the ModTV pattern is now 20% off until May 31st!  Yippee!

PURCHASE THE MODTV PATTERN – PAPER VERSION
PURCHASE THE MODTV PATTERN – PDF VERSION

Fabrics —
•  To Make just (1) ModTV block –
— (2) Fat Quarters;
— 3″ x 6″ scrap for the TV Antenna;
— 5″ x 7″ Piece of Fusible Web to Fuse the TV screen in place (i.e.:  Heat n Bond Lite, Steam a Seam II Lite or Pellon Wonder Under;
**For each additional TV block you’d like to make just add a another pair of fat quarters and a fabric scrap for the TV Antenna.

IMG_1002

•  To Make the Larger 48″ x 54″ Quilt (16 TV’s plus (4) Color Bar Blocks) – refer to the cover of the pattern –
— (16) Coordinating Fabrics – 3/8 yard each fabric;
— Dark Grey (or Black) plus a White (for color bars) – 1/6 yard each;
— (Optional for the quiltalong) Binding – 1/2 yard and Backing 3-1/2 yards;
— 1-1/2 yards of Fusible Web to Iron the TV screen in place (i.e.:  Heat n Bond Lite, Steam a Seam II Lite or Pellon Wonder Under16 Fabrics

Also begin to think about whether you might like to personalize the TV screen with a piece of licensed fabric (like ‘I Love Lucy’ or ‘Star Wars’), or perhaps a fun zigzag print that looks like static, or a photo of a favorite person or family pet (photo should be sized to 4″ x 6″).
IMG_0998

If you do want to use a photo, be sure to purchase some photo fabric from your local quilt shop or at a Joann’s Fabrics or Walmart.  I prefer the brands EQ Printables or June Tailor Computer Printer Fabric.  Make sure you select the type for your printer at home:  InkJet or Laser.


Precut to be ready for Week #2 —
Screen Shot 2019-09-22 at 4.26.21 PMFirst off, before cutting – I really, really, really  like to starch my fabric.  Mary Ellen’s Best Press is terrific stuff but it it’s too pricey to use on larger pieces…so when I need to starch several yards or a larger piece, I use the Faultless Gold Top Firm Finish Spray Starch. First you can’t beat the price at like $1.99 a can – available at Target, Walmart, the supermarket, etc….  Secondly, I just happen to love the way it makes my fabric feel.  It gives the fabric a firm hand but not too stiff and makes my cutting and piecing more precise.  Use a hot dry iron (no steam) and definitely starch the fabric before you make that first cut as the fabric may shrink ever so slightly after the starch is ironed dry.

Next,  precut your fabrics to make (1) TV block –
•  If just making a single TV block:  gather your (2) fat quarters, or;
•  If making the pattern cover Lap Size Quilt, select (2) fabrics – 3/8 yard each fabric.

Follow all of the cutting directions and dimensions in the ModTV  pattern on pages 1 & 2.  In the pattern there is also a handy insert page which details and diagrams how to cut your pieces from the 3/8 yard cut or the fat quarter to ensure that you get all of your pieces from the yardage.

Precut1
And with all of these pieces, it can really get confusing so here’s my BIG TIP for the week!  –  be sure to label each of your pieces to keep them organized.  Each ModTV block is made from three sub units:  the TV unit,  the legs unit  & the antenna unit.  All three units come together on the final step to create one 12″ finished ModTV block.  The TV screen is ironed on after the TV block is together.

If I’m making just one block, I might just use post it notes or scrap pieces of paper to label each of my pieces.

But, if I’m making several blocks, I open up my word processing program (like MS Word) and choose the address label template …I type in all of my unit names and then copy those descriptions (X) however many blocks I am making.

Labels

I then peel these labels off and apply them to each unit.  This little tip keeps you super organized and ready to to start piecing for next week!

That’s it for Week #1!!  Next week – Week #2: we’ll begin slashing and sewing our TV sets together – woohoo!

Until then, please be sure to email us at colourwerx@yahoo.com if you have any questions.  Or feel free to post questions or progress pictures on our Colourwerx QAL Facebook Group.

Until your next colour fix and next week’s QAL post ~  happy and bright quilting always!    L&C xxoo

Wonky Piecing & Easy Applique QAL – Week 4 – Easy Machine Applique & Finish

Wonky Week 3 Slug 4Welcome back!   It’s our final week – Week #4 – of our Wonky Piecing & Easy Appliqué QuiltAlong !  This week is all about applique stitching your animal shapes to your background fabric and then finishing off your project into either a wallhanging or pillow!

I’ll also be sharing with you how to get your sewing machine ready for machine applique, how to do some basic applique stitches, sew in and out of points and some very  general “rules of the road” to perfect your own applique stitch!  So let’s get started!

Screen Shot 2020-04-27 at 11.23.01 AM

First off, my biggest tip to perfect applique stitching is: practice, practice practice….  Machine applique requires practice and alot of patience.  You may want to review this blog post, watch my companion video or subscribe to our Colourwerx UTube channel.  Then set yourself up with some basic scrap shapes like squares and circles on a background fabric and practice, practice, practice.

But first things first….

Set Your Machine Up For Success –
Here’s how I set my machine up for a day of applique:
1.  Open Toe Presser Foot – a must!  Notice that this foot  has no bars or metal in the middle of the two outer prongs – this allows you to see the “open road” ahead of you while stitching.  For me, it is a must have before I start any applique stitching;

Open Toe
2.  Schmetz 90/14 Quilting Needle – here we go again 🙂  but this size and type needle is perfect for applique stitching and allows me to switch from thread to thread regardless of the thread thickness as I applique stitch;

Needle
3.  Bobbin Thread – Regardless of the thread you choose for stitching around your shapes, I always use a neutral colored cotton 50 weight thread in the bobbin – usually the same weight and color thread that I piece my quilts with — something like a tan or light grey Aurifil 50 weight (look for the orange colored spool) works well.  Although the exception to this is that if the piece will be finished as a wallhanging and I have already pre-quilted the background fabric, I will match my bobbin thread to the backing fabric – again, using a 50 weight thread;


4.  Set Your Stitch to ZigZag – This is stitch #2 on my Bernina machine and my go-to stitch settings are: Width – 3.0, and Length – just under 0.8-0.9.  This seems to be good starting point for me.  Your machine may be slightly different and more than likely, you’ll need to adjust your settings as you practice and gain more confidence.

Machine 1
5.  Very Important:  Test Your Stitch & Adjust Your Tension – Once you have your machine set up, test your machine by stitching out a straight line of zigzag stitches.

Test 1

Check your tension –   common issues are these:
If you see the bobbin thread (gray) on top like this, adjust your tension dial to a higher number;

Test 2

If you see the top thread (orange) on the bottom of your stitches like this, adjust your tension dial to a lower number;

Test 3

If your stitches “caterpillar” like this – you’ll need to attach a stabilizer to the wrong side  of your background fabric.

Test 4

Sulky

Stabilizer is just as the name suggests:  it provides stability to your stitching and helps to avoid distorted stitches.  Any stabilizer (like you use with digitized embroidery machines) will work just fine and even freezer paper works in a pinch!  My favorite brand is Sulky Iron On Tear Away Stabilizer.  (Sidenote:  If you pre-quilted your background fabric,  you won’t need to add a stabilizer.  The batting acts like the stabilizer.) 

Iron Your Shapes On to Your Background Fabric –
Once your machine is set up, you are ready to go and it’s time to iron your animal shapes onto your background fabric.

Score the release paper on the back of your applique shapes with a pin and then peel the release paper off.

Score

Place your shapes in place on your background fabric – making sure that those shapes  that are overlapped by others are placed down first.  Once satisfied with placement, with a hot iron, press the shapes down applying at least 10-15 seconds of heat to the shape to secure it firmly to your background fabric.

Pattern Ease

You might want to make an overlay sheet for something like the ModFish which has several shapes overlapped on one another.  This can be made from tracing paper or a dress making interfacing product called Pattern – Ease which is sold at stores like Joann’s.  Pattern Ease is a non fusible, woven lightweight interfacing.  I like it because I can trace my pattern on it, place it over my background and then move the individual shapes into place under the Pattern Ease. Once satisfied, I can iron right through the Pattern Ease to secure the shapes in place.

This slideshow requires JavaScript.

Additionally, I like to fuse the smaller shapes onto their bigger shapes and stitch around those smaller shapes before fusing that bigger shape onto the background fabric.  Great examples of this are: the ModCat head and eyes and eyelids, or the ModDog eyeball; or the ModFish eye, or ModFish fin on the belly! .

Small Shapes

Why make your job harder?  Take for example the ModCat head, once the eyes and eyelids are fused in place, I leave the release paper on the wrong side of the head as it acts as a stabilizer and then I applique stitch around those shapes…I only have to wrestle with the head and concentrate on making my stitching around the eyes perfect and not deal with the whole background fabric, etc.  Easy-peazy!

Applique Stitching “Rules of the Road” –
I’ll do my best to explain these here on the blog but if you are more of a visual learner than I would encourage you to check out my companion video to this week’s quilt along which is now posted on our Colourwerx website and Colourwerx UTube channel.

1. Starting: Whenever I start, I like to bring my bobbin thread to the top.  This stops all of those nasty thread nests from occurring as you start. Turning your hand wheel one whole rotation, lower the needle into the fabric and then all the way back up again.  Pull on the top threads and pop the bobbin thread up to the top.  Now hold onto both the top and bobbin threads to start stitching. Secure the start of your stitch by either engaging your “secure stitch function” (check your manuals) or taking a stitch in place.   You can also just start stitching and when you finish going around the shape, you can bring all the threads to the backside, knot the threads and tie off.

This slideshow requires JavaScript.

2.  Start Stitching:  Notice the photos below – the needle is “zagging” just to the outside of the applique shape and then “zigging” back onto the shape itself.  The foot is NOT really positioned in “dead center” of the shape and the background fabric.  The foot actually rides more onto the applique shape itself .  This is where I personally like my zig zag stitch to fall when I stitch.

3.  Stitching Around Curves:  Again check out the companion video as that might help, but the general rule on stitching around curves is as follows:

if it’s an outside curve, stop and pivot on the on the outside edge:  to do this, stop with the needle down on the OUTSIDE edge of the applique, lift the presser foot with the needle still down,  pivot (or turn toward you) the applique piece ever so slightly, drop the presser foot and take a stitch or two until you feel you need to stop again and pivot to maintain your stitch quality and position on the edge of the applique;


…if it’s an inside curve, stop and pivot on the inside edge: just as above, stop with the needle down on the INSIDE edge of the applique, lift the presser foot with the needle still down,  pivot (or turn away from you) the applique piece ever so slightly, drop the presser foot and take a stitch or two until you feel you need to stop again and pivot to maintain your stitch quality and place on the edge of the applique.

When you are turning the corner and the stitch is falling on the outside edge of the applique, try to aim for the same exact point as you go around the corner (see the 4th picture where the purple pen indicates).

Straightaways are easy – curves and circles are not so easy because it requires patience and lots of stop and pivots , stops and pivots to stitch around the curve.  You might find that it will take you just as long to stitch around a small curve as it does for you to stitch the rest of the applique with straightaways. A great example of this is the top of the cat tail or the little paws on the Mini ModDog.   Be patient, slow down and practice.

3.  Stitching In and Out Of A Point: There are some really beautiful ways of stitching in and out of points but this requires dialing your stitch width down and up again as you keep stitching (meaning reducing your stitch width as you approach the point and then increasing your stitch width as you stitch out of the point)…this is a little like rubbing your stomach and patting your head at the same time and takes a lot of practice.

I prefer to do a more “lazy man’s” way of stitching in and out of points.  Stitch all the way down and directly over the point. Keeping the needle down, lift your presser foot and pivot the piece so that it is now at a 45 degree angle to the presser foot.  Take one, (sometimes two) complete stitches so the needle is again on the outside edge but on the opposite side of the point.  Again keeping the needle down, lift the presser foot and pivot the piece so you are ready to stitch down the new side.  Continue on stitching.   It’s appears a bit bulky but it works!

Now with that and a little practice – applique away!

Finish your Animal –
To Make Into a Wallhanging – Once all appliqué stitching is complete, trim your project down so the edges are neat and even.  Here are the approximate measurements of my samples to give you an idea:
•  Mini MoDog 12-1/2″ x 16-1/2″
•  ModCat – 15″ x 21″
•  ModFish – 21″ x 14-16

Bind the wallhanging as desired.

To Make Into a Pillow – Once all appliqué stitching is complete, trim your project down so the edges are neat and even. I’ll explain in detail below what I do for a Mini ModDog, but if you are making a Cat or Fish, you may want to find the appropriate size pillow form first and then cut the project 1/2″ larger than the pillow size and then size the backing fabric accordingly using the Mini ModDog examples below.

Trim the Mini ModDog to 12-1/2″ X 16-1/2″.

I use a Travel Pillow Form for my Mini ModDogs that measures 12″ x 16″.

Cut the Backing Fabric into 2 pieces: 12-1/2” x 14-1/2” and 12-1/2” x 12-1/2”.  Turn and press only one outer edge (not the 12-1/2” edges though) of each backing piece 1/4” over twice to the wrong side to encase the raw edge. Topstitch down the edge to secure. Place the two backing fabric units RIGHT SIDES TOGETHER over the Mod Dog and stitch around all sides. Turn the unit right side out and poke out the corners. Stuff with a 12” x 16” travel pillow form through the slit on the backside.

This now concludes our Wonky Pieced & Easy Applique QuiltAlong – send me your pictures so we can see your cute and fun Wonky Pieced Mod Animals!!

Thank you so much for following along and for your continued support!  Look for more Colourwerx QuiltAlongs on our Colourwerx Facebook page or on our website under QuiltAlongs!mouth21

Until your next colour fix – happy quilting!  Linda & Carl xxoo


Wonky Piecing & Easy Applique QAL – Week 3 – Machine Quilt the Background

Wonky Week 3 SlugWelcome back!   It’s Week #3 of our Wonky Piecing & Easy Appliqué QuiltAlong !  This week we’ll be machine quilting the background fabric.

There are so many different ways you can machine quilt the background fabric and anything goes so don’t be afraid to use this little quilt along project to experiment:

•  you could practice your free motion quilting and simply stipple the background;
BG Quilt 1
•  you could practice ‘matchstick quilting’ – this is simply stitching straight lines about 1/4″ apart up and down over the background fabric; or,

BG Quilt 2
•  you could mark diagonal lines about 3″ apart, set your machine to a decorative stitch and stitch a crosshatch pattern.

BG Quilt 3

Really – anything goes, so have fun ….

But I’d like to share with you three of my favorite machine quilting patterns that look “artsy”, are pretty easy to do and imho, make a great quilted background for smaller quilts like these.  I’ll do my best to explain how to do these patterns here in the blog but if you are more of a visual learner than I would encourage you to check out my companion video to this week’s quilt along which will be posted on our Colourwerx website and Colourwerx UTube channel in a few days.

Linda Week 3

These are the three patterns I use most often:
•  The Wonky Slanted Line pattern – you see this most often in my Mini ModDog pillows and quilts, and if you have the Mini ModDog pattern, you’ll find instructions on how to do this pattern on page 2;

Wonky Slanted

•  The Curvaceous Quilting Pattern – easy to do and very relaxing!

Curvaceous

•  The Wonky Chevron Pattern – this is fun and  is wonderfully forgiving.

Wonky Chevron

Create the Quilting Sandwich —
First you’ll need to gather your Background Fabric (a fat quarter or a piece about 18″ x 21″) , and a scrap piece of batting or fusible batting of the same size.  If you’ve already decided to make your animal into a wallhanging, then you should also gather a fat quarter size of fabric to use as your backing fabric too. (If you are making a pillow, you don’t need to add a backing fabric unless of course you think you might wash the pillow in the future).

Place the batting on the WRONG side of the Background Fabric and secure.  You can do this by safety pinning the two layers together or using a fusible adhesive spray like 505 Temporary Spray Adhesive.  If you are making a wallhanging, go ahead and fuse (or safety pin)  your backing fabric to the other side of the batting as well.    You now have your quilting sandwich ready for machine quilting.

FuseWonky Slanted

Let’s get started with the first quilting pattern –

#1 – The Wonky Slanted Line Pattern —
When I quilt this pattern, I like to use a chunky thread – like the Aurifil 12 weight – and a variety of different thread colors – usually I choose 5-6 different colors.  But this method also looks very nice with any variegated thread or even just a lovely solid thread.

Also just a tip – if you are using a a chunkier thread, make sure you change your sewing machine needle to a larger size.  I prefer to use the Schmetz 90/14 Quilting Needle.  This size accommodates a variety of different weight threads with no problems.

schmetz-quilting-needles-size-90-14-184-p
The first step is to draw a few wonky lines on your background fabric.  With a iron off marker (or water soluble pen), just drop your ruler at a slant and draw a line.  Slant the ruler in opposite direction and draw another line.  You can also use a Hera marker to make these lines as well.  Hera Markers are sold at all quilt shops and actually just crease your fabric with the rounded edge – so no fear of a marker staining the fabric or never coming off.

Start with about 3-4 lines and with your first thread color.  Set your machine to a straight stitch, leave the feed dogs up and put your walking foot on (or engage your even feed system).  Also set your stitch length to about 3.0 so the stitches are a bit longer.   Stitch directly across those drawn lines.

Wonky 1

Mark another 3-4 lines.  Switch threads if you’d like, and stitch on those lines.

Wonky 2

Continue adding wonky slanted lines and stitching until you have filled the background fabric.


Voila!  Done And it looks super especially behind your dog, cat or fish!Curvaceous

#2 – The Curvaceous Quilting Pattern —
I really love doing curvy quilting – it looks very artsy and I love the movement it provides to the background fabric.  I use this pattern alot when making the ModFish as it gives the feeling that the fish are swimming with the movement the curved lines create.

To start, again set your machine to a straight stitch, leave the feed dogs up and put your walking foot on (or engage your even feed system).  Also set your stitch length to about 3.0 so the stitches are a bit longer.  Start in the middle of the fat quarter and just stitch straight stitches from the top to the bottom, gently ‘ungulating’ from right to left creating a curved stitched line.  Think of driving down a country road – no sharp turns.

Curvy 1

Move over about 2-3″ and stitch another curvy line.  Again move over another 2-3″ and stitch another curvy line.  Keep filling the background with curved stitched lines about 2-3″ apart.
Curvy 2
To fill in the background, next begin to stitch in between the stitched lines with more curvy quilting.  How dense you make the curvy quilting is entirely up to you.  I find that it really depends upon my mood – some curvaceous quilting is quilted quite dense and some not so much…again, anything goes and stop when it looks good to you!

That’s it – doesn’t that look great!?!?Wonky Chevron

#3 – The Wonky Chevron Pattern —
This is a fun pattern, looks great with a variegated thread and one that I use alot on my little ModCat wallhangings .  Once again, set your machine to a straight stitch leave the feed dogs up and put your walking foot on (or engage your even feed system).

The first step is to draw a few chevron-like lines across the center portion of your background fabric.  With a iron off marker (or water soluable pen),  just drop your ruler slanting it right and left and draw wonky angles or chevrons. Don’t worry about making the chevrons too even or regimented – in fact the more uneven they are the better!
Chev 1

Stitch directly on the drawn line  (it’s ok if you are not directly on the drawn line – it’s more of a guide for you to start from…)  Now move down about an inch and “echo” the same chevron pattern but don’t try to be too perfect – in fact, adding little changes or additional little chevrons to “mix it up” as you stitch along makes it look more artsy.

Chev 2

Keep echoing and stitching  out from the middle drawn first chevron until you reach the edge.  Turn the background fabric around and start to do the same chevron echo stitching from the middle drawn line out to the other edge filling up the background fabric with wonky chevron lines.   Check that out!

What fun!  🙂  I can’t wait to see what you guys come up with!  be sure to chedk out the companion video to this week’s blog coming out in a few days on the Colourwerx website and Colourwerx UTube channel .

That’s it for Week #3!!  Next week – our final week – Week #4: we’ll be machine applique stitching our animal shapes onto the background fabric and I’ll be sharing some tips and tricks with you!

Until then, please be sure to email us at colourwerx@yahoo.com if you have any questions.  Or feel free to post progress pictures on our Colourwerx QAL Facebook Group.

Until your next colour fix and next week’s QAL post ~  happy and bright quilting always!    L&C xxoo

Wonky Piecing & Easy Applique QAL – Week 2 -Wonky Piecing Made Simple & Cutting Out Your Animal Shapes!

Wonky Week 2 SlugWelcome back!   It’s Week #2 of our Wonky Piecing & Easy Appliqué QuiltAlong !  This week we’ll be creating our Wonky Piecing Strip Sets, fusing your animal shapes onto those strips sets and then cutting out the animal shapes.

If you’re just joining us this week, be sure to review Week #1’s Blog Post to find out how to purchase the pattern and what fabrics and materials you’ll need to gather –

READ WEEK #1’S POST BY CLICKING HERE

Also, just a friendly reminder!   If you want to join with other quilty friends and aren’t yet a member of our Facebook group, I invite you to join our free QAL Facebook group where you can ask questions, share your progress and of course, post pictures of your finished projects so everyone can share in the fun!  Also feel free to share this invite and any other QAL news with quilty buddies and invite them to join along in the fun!

JOIN THE COLOURWERX QAL FACEBOOK GROUP HERE

Let’s get started! —
I love ‘wonky piecing’!  It’s liberating, easy to do and best of all you don’t need to have an exact or even perfect 1/4″ seam.   First, gather your strips.

Lay out the strips near your sewing machine in a pleasing manner.  This can be in whatever order you think looks good and there is no right or wrong. I’ll be making a ModCat with you while we quilt along together so here are my strips laid out on the cutting board in what looks like to me a very pleasing manner.

Wonky 1

Follow the directions for wonky piecing in your patterns:  MiniModDog – Page 1; ModCat – pages 3-4; ModFish – pages 4-5.  In the pattern you’ll find fully illustrated diagrams to assist you.

But first I want to share a little trick that I like to do.  I like to “audition” the wonky angle before stitching 2 strips together. Begin your wonky piecing with the two bottom strips.

Here’s what I do to “audition” the angle before stitching:  I place the top strip Right Side Up on the other strip, slanting it at an angle or in the case below, slanting from top left to bottom right  – this allows you to “audition” the wonky angle before stitching it.

Wonky 2

Once satisfied with your “slant”, just flip the the top strip over on top of the bottom strip mimicking that angle so the strips are now Right Sides Together.

Wonky 3

Next just stitch the strips together and cut away the extra fabric beyond the stitching line as per your pattern instructions.

To add the next strip, just take the third strip in sequence, place it Right Side Together slanting in the opposite direction and “audition” the angle.  Looks good!  Ok – Flip that strip over so the strips are now Right Sides Together mimicking the angle and stitch to the second strip.

Then just continue on until your wonky pieced strip set is large enough for your animal shape.  Here are my (2) Wonky Pieced Strip Sets for my ModCat – one for the body and one for the head .

Wonky 12

And here’s an example of what some Wonky Strip Pieced Sets might look like for a ModDog or ModFish:

Now you’re done with your Wonky Piecing and the real fun begins…fusing your animal shapes onto the wrong side of the strips sets and cutting out your animal shapes out!!

First, Rough Cut Out Your Shapes From the Fusible Web —
This step seems to confuse some people. 

Simply put, it means to cut out your animal shapes from the fusible web 1/4″-1/2″ BEYOND THE DRAWN LINE NOT ON THE DRAWN LINE like so…

Rouch Cut

Next, fuse your shapes to the WRONG side of your wonky pieced strip sets.  Also fuse the other shapes to the your selected fabrics at this time:  for example, the dog collar, or let’s say the fish faces or cat eyelids, etc…

With a sharp pair of scissors, cut out the shapes on the drawn line – take your time here and be exact.   Here’s my ModCat shapes all cut out.

Here’s what your ModDog or ModFish shapes might look like after being cut out:

Just a word on scissors I love these Karen Kay Buckley Precision Tip scissors pictured below.  These are about 5″ long, easy and comfortable to grip and are the perfect little pair of scissors for precision cutting of applique shapes of any size.  There are my go-to scissors for just this kind of work and I highly recommend them!

You can purchase them at your local quilt shop or any online retailer.

Cut 2

Look for a little companion video on Week #2 – Wonky Piecing to be posted in a few days!

Yay!  🙂  That’s it for Week #2!!  Next week – Week #3: we’ll be machine quilting up the background fabric and I’ll show you a few different ideas that you can incorporate into your quilting!!

Until then, please be sure to email us at colourwerx@yahoo.com if you have any questions.  Or feel free to post progress pictures on our Colourwerx QAL Facebook Group.

Until your next colour fix and next week’s QAL post ~  happy and bright quilting always!    L&C xxoo

Wonky Piecing & Easy Appliqué QuiltAlong – Week 1 -Gather the Pattern and Materials

Wonky Week 1 SlugHello!  And welcome to the ‘first week’ of our third Colourwerx QAL (quilt along) where we’ll be stitchin’ up Wonky Piecing and doing Easy Machine Appliqué – the fun part about this QuiltAlong is you get to choose which animal you’d like to make – A Mini ModDog, a ModCat or a pair of ModFish!

A BIG THANK YOU!!  —
First, I want to thank you so much for joining us here and for your ongoing support of our Colourwerx patterns and Colourwerx Shop during these unprecedented times – brighter days are indeed coming back soon but in the meantime since we are all still self isolating, the Wonky Piecing & Easy Appliqué Dog/Cat/Fish seemed like the perfect project!  The materials you’ll need are minimal and are likely sitting right inside your fabric stash or scrap bag.  The pattern can be purchased from our Colourwerx Shop and no matter which animal your choose (Mini ModDog, ModCat or Mod Fish), all are available in both a paper format or as a downloadable PDF format.

Regardless – Carl and I are so, so, so  happy you are here!!   Please know whether you’ll be sewing up the pattern along side us or just observing from afar, we welcome you and are overwhelmed by your enthusiasm  and so appreciative of your support  – so thank you, thank you, thank you! 

WideeyedThriftyBarebirdbat-size_restricted

As you can see below it’s a 4-week QAL this time, but please know that you can take it at your own pace and join in anytime.  All of the videos and blog posts will remain here on my blog, as well as be posted on our website and social media pages throughout the year.  There is no fee to join the QAL or our Facebook Group page so feel free to hop in anytime you are ready!

Join the Colourwerx QuiltAlong Facebook Group:   Speaking of the Facebook Colourwerx QuiltAlong Group,  if you want to join with other quilty friends and aren’t yet a member of our Facebook group, I  invite you to join our free QAL Facebook group where you can ask questions, share your progress and of course, post pictures of your finished projects so everyone can share in the fun!  Also feel free to share this invite and any other QAL news with quilty buddies and invite them to join along in the fun!

JOIN THE COLOURWERX QAL FACEBOOK GROUP HERE

Look for a companion video to be posted later this week…..

Linda Week 3

So this is Week#1 of the Wonky Piecing & Easy Appliqué QAL –  First let’s review the schedule over the next four weeks:

Week 1 (today-April 8th) – Gather Your Pattern & Materials
Week 2 (April 15) – Wonky Piecing & Cut Out Your Animal
Week 3 (April 22) – Quilt the Background Fabric & Prepare Shapes
Week 4 (April 29) – Easy Machine Appliqué & Finish

Wonky QAL Slug
Here’s what you’ll need though to join in on the stitchin’ fun –

GET THE PATTERN —
Choose Which Animal You’d like To Create and Purchase the Corresponding Pattern:
There are 3 patterns to choose from : the Mini ModDog, the ModCat and the ModFish – all of our Colourwerx patterns are now 20% off until the end of April so now’s a great time to stock up! Also our patterns are available in both a paper format or as a downloadable PDF format.

Click on the links below to purchase the patterns :
Mini_ModDog_PatternCover copy

PURCHASE THE PAPER PATTERN – MINI MODDOG

PURCHASE THE PDF PATTERN – MINI MODDOG


ModCat_CW109_FRONT


PURCHASE THE PAPER PATTERN – MODCAT

PURCHASE THE PDF PATTERN – MODCAT

CW127 ModFish Front


PURCHASE THE PAPER PATTERN – MODFISH

PURCHASE THE PDF PATTERN – MODFISH


GATHER YOUR MATERIALS —
Each animal has slightly different fabric requirements but as you’ll see below the “wonky piecing” is made from smaller length fabric strips (these strips can be orphaned jelly roll strips or cut from your stash or scrap bin).  Although the requirements below stipulate 2-1/2″ wide strips,  the strips can really be anywhere from 2″ wide to 3″ wide X 14″ in length (or thereabouts).

— For (1) MINI MODDOG, gather these fabrics: Mini ModDog
a. (10) 2-1/2” x 14” strips of coordinating fabrics
b. 1″ x 6” piece scrap fabric for dog collar
c. Scrap of black or 5/8” button for dog eye

ModCat


— For (1) MODCAT, gather these fabrics:
a. (20) 2-1/2” x 14” strips of coordinating fabrics or scrap fabrics
b. 4″ x 6” scrap for cat eyelids of coordinating solid fabric
c. 4″ x 6” scrap of dark brown or black for cat eyeballs
ModFish

— For a pair of MODFISH (using the Small Fish shapes), gather these fabrics:
a. (10-12) 2-1/2” x 14” strips of coordinating fabrics
b. (2) 9” x 4” scraps for fish bellies (can be the same fabric or two different fabrics)
c. (1) 6″ x 10” scrap of black for fish head/eyes
d. (1) 3” x 3” scrap for fish outer eyes (white)

•  Additionally, whichever animal you choose you will also need the following materials:
•  (1) Neutral Colored Fat Quarter (or an 18″ x 21″ piece of fabric) for the Background
•  (1) Fat Quarter (18″ x 21″) Size of Scrap Batting or Fusible Fleece (like Pellon 987F)
• 1/2 yard of Fusible Web (not to be confused with interfacing so please check to make sure you have a lightweight iron on advhesive) – Look for the brand names like Heat ‘n Bond Lite, Steam a Seam Lite II, Pellon Wonder Under etc…
• Your favorite threads for stitching the background fabric and for appliqué stitching around your animal shapes.

TRACE THE SHAPES ON THE FUSIBLE WEB —
To be ready for next week – ‘Week #2 – Wonky Piecing & Cut Out Your Animal’ – trace the animal shapes from the pattern on to the smooth side of your fusible web.    If you need to purchase fusible web and can’t do so for a few days , that is ok as you can make up this step in Week #2.

ScaleNOTE for PDF Pattern Users: If you purchased a PDF pattern before tracing the shapes, make sure that when you printed out your pattern page you maintained the correct scale for the pattern shapes.  You can do this by placing your ruler on the 1″ scale graphic included on each pattern shape page.  If it measures correctly, you are ready to start tracing.  If it measures less or more than the 1″ scale, then you will need to adjust your printer settings  to “Print Actual Size” and reprint the pattern pages until the 1″ scale measures correctly.

Follow the manufacturer’s directions for tracing you shapes and also:
•  Trace just one of each shape with the exception of the ModFish (trace 2 of each of the Small ModFish shapes).
•  Use a mechanical pencil or #2 pencil to trace the shapes;
•  Trace the shapes directly on the lines – you do not need to add 1/4″ seam allowance to any of the shapes;
•  Trace all of the shapes independently and apart from each other:
•  If a shape has a dotted line, include the dotted line when tracing your shape. Some of the shapes you will encounter here that have the dotted lines are:
•  Mini ModDog – Shape A – second ear
•  ModCat – EyeBalls (lower half of Cat Eye)
•  Mod Fish – Shape K (belly) & Shape M (top of fish) – when you trace Shape H – trace all the way out beyond the dotted lines to the solid line of the fish head shape.

Here’s a quick view of what my animal shapes look like when I’ve finished tracing them on the fusible web.

This slideshow requires JavaScript.

DO NOT CUT THE SHAPES APART JUST YET – JUST TRACE THE SHAPES ON THE FUSIBLE WEB SHEET AND SET ASIDE FOR WEEK #2.

Yay!  🙂  That’s it for Week #1!!  Next week – Week #2: we’ll create the wonky strip piecing units which you’ll cut your animal shapes from.

Until then, please be sure to email us at colourwerx@yahoo.com if you have any questions.  Or feel free to post progress pictures on our Colourwerx QAL Facebook Group.

Until your next colour fix and next week’s QAL post ~  happy and bright quilting always!    L&C xxoo

Stay at Home and Hop – Let’s Hop To It! – Post #4

PrintHello friends!  Welcome back to our last post for the Stay at Home and Hop Virtual Designer Shop Hop!

I have one last list of designer links to share with you!  When you need a break from sewing or from the news this week, hop on to your Ipad or computer and visit my fellow friends and colleagues below.  In case you’ve missed my previous posts or lost the links, I’ve also listed ALL the shop links from my previous posts at the end of this blog post!

I hope you’ll take a moment from your day and pop in to see some of my friends!  The hop runs until Tuesday, March 31st!

And speaking of hopping – be sure to download my free pattern – the Easter Hip Chicks Table Runner!  This pattern will only be available as a free download for a limited time!   To download the  Easter Hip Chicks Table Runner, just click here to download the pattern for free!!

New Chicks 1

OK – LET’S GET HOPPIN”!!  Here’s the last list of links for you to visit from our Stay at Home and Hop with Us Virtual designer Shop Hop! Click on the links below to take you to that designer’s shop!

DaySpring Quilt Company
https://www.dayspringquiltcompany.com

Ms P Designs, USA
https://www.mspdesignsusa.com

Stitchin’ at Home
http://www.stitchinathome.com

Sew Joy Creations
https://www.sewjoycreations.com

Ships & Violins
https://www.shipsandviolins.com

Patti’s Patchwork
https://www.pattispatchwork.com

Your Sewing Friend
https://www.etsy.com/shop/yoursewingfriend

The Geeky Bobbin
https://www.geekybobbin.com

Colourwerx Designs (that’s me!!)
https://www.colourwerx.com

Kate Colleran Designs
https://www.seamslikeadream.com

mouth21
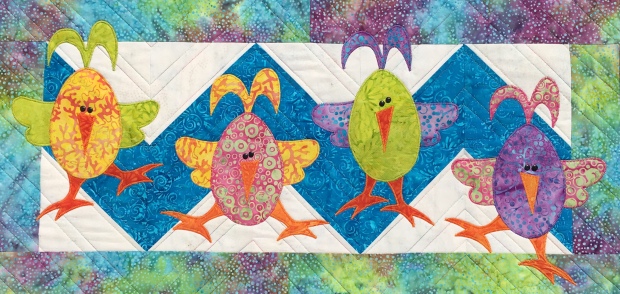
Thank you for hopping with us, friends!  We all really appreciate your support at this time!  Happy quilting! xxoo L&C


And if you missed my Stay at Home & Hop previous posts this last week – here are those Designer shop links again for you to explore or share with your quilty friends:

Lone Star Pattern Works
https://www.lonestarpatternworks.com

Powered by Quilting
https://www.poweredbyquilting.com

Cottage Rose Quilt Patterns
https://www.cottagerosequiltshop.com

The Cloth Parcel
https://www.theclothparcel.com

Faith and Fabric
https://www.faithandfabricdesign.com

Linen Closet Designs
http://www.linenclosetdesigns.com

Designs by Sarah J
https://www.designsbysarahj.com

Rona the Ribbiter Quilts
https://www.ronatheribbiter.com

Quilt Fox Designs
https://www.quiltfox-design.com

Seam to Be Sew
https://www.seamstobesew.com

Studio R Quilts
https://www.studiorquilts.com

Toadally Quilts
https://www.toadallyquilts.com

From Blank Pages
https://www.fromblankpages.com

Cotton Street Commons
http://www.cottonstreetcommons.com

Puppy Girl Designs
http://www.puppygirldesigns.com

Phoebe Moon Quilt Designs
https://www.facebook.com/phoebemoondesgins

The Devoted Quilter
https://www.devotedquilter.com

Christa Quilts
https://www.christaquilts.com

Stitched by Susan
http://www.stitchedbysusan.com

Tamarinis
https://www.tamarinis.com

Bequilter   
https://www.beaquilter.com/shop

Presto Avenue Designs
https://www.prestoavenuedesigns.com

Cheryl Lynch Quilts
https://www.cheryllynchquilts.com

Love to Color My World
https://www.lovetocolormyworld.blogspot.com

Hissyfitz Designs
https://www.hissyfitzdesigns.com

Canton Village Quilt Works
https://www.cvquiltworks.com

Anjeanette Klinder Designs
http://www.anjeanettek.com

Pat Sloan – The Voice of Quilting
https://www.blog.patsloan.com

Said With Love
https://www.saidwithlove.com.au

Orange Blossom Quilt Design
https://www.orangeblossomquilt.com


Stay at Home and Hop – Free Pattern and A Few More Friends! – Post #3

PrintHello friends!  I hope this post finds you healthy and staying busy as we “#stayathomeandhop….. Are you ready to hop again?

And speaking of hopping – Easter is just around the corner!  I just finished remaking my Easter Hip Chicks Table Runner for our Easter table – isn’t it cute?  I used an assortment of scraps from Island Batik.

New Chicks 1

Screen Shot 2020-03-26 at 5.15.57 PM
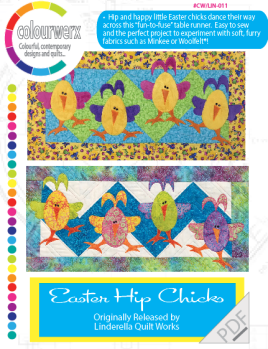
And guess what?  I want you to make one as well!  Since we are all staying at home and frankly might need to stay at home until Easter, I want to share this pattern with you!  To make your own Easter Hip Chicks Table Runner, just click here to download the pattern for free!!

OK – LET’S GET HOPPIN”!!   Onto Part 3 of the Stay at Home and Hop with Us!   I have another  new list of quilting friends to share with you!  You know what to do, right?!?   Yup, that’s right – hop to it and click on the links below to take you to that designer’s shop!

Lone Star Pattern Works
https://www.lonestarpatternworks.com

Powered by Quilting
https://www.poweredbyquilting.com

Cottage Rose Quilt Patterns
https://www.cottagerosequiltshop.com

The Cloth Parcel
https://www.theclothparcel.com

Faith and Fabric
https://www.faithandfabricdesign.com

Linen Closet Designs
http://www.linenclosetdesigns.com

Designs by Sarah J
https://www.designsbysarahj.com

Rona the Ribbiter Quilts
https://www.ronatheribbiter.com

Quilt Fox Designs
https://www.quiltfox-design.com

Seam to Be Sew
https://www.seamstobesew.com

I’ll be sharing my last list of friends for the Stay at Home and Hop  with you on Monday, so stay tuned!! Meanwhile, have fun with he Easter Hip Chicks pattern, stay safe, go forth and explore my designer friends and have fun! You never know what you might discover!!

Happy quilting! xxoo L&C
And if you missed my Stay at Home & Hop Posts #1 & #2 this last week – here are those Designer shop links again for you to explore or share with your quilty friends:

Studio R Quilts
https://www.studiorquilts.com

Toadally Quilts
https://www.toadallyquilts.com

From Blank Pages
https://www.fromblankpages.com

Cotton Street Commons
http://www.cottonstreetcommons.com

Puppy Girl Designs
http://www.puppygirldesigns.com

Phoebe Moon Quilt Designs
https://www.facebook.com/phoebemoondesgins

The Devoted Quilter
https://www.devotedquilter.com

Christa Quilts
https://www.christaquilts.com

Stitched by Susan
http://www.stitchedbysusan.com

Tamarinis
https://www.tamarinis.com

Bequilter   
https://www.beaquilter.com/shop

Presto Avenue Designs
https://www.prestoavenuedesigns.com

Cheryl Lynch Quilts
https://www.cheryllynchquilts.com

Love to Color My World
https://www.lovetocolormyworld.blogspot.com

Hissyfitz Designs
https://www.hissyfitzdesigns.com

Canton Village Quilt Works
https://www.cvquiltworks.com

Anjeanette Klinder Designs
http://www.anjeanettek.com

Pat Sloan – The Voice of Quilting
https://www.blog.patsloan.com

Said With Love
https://www.saidwithlove.com.au

Orange Blossom Quilt Design
https://www.orangeblossomquilt.com


Stay at Home and Hop – Meet More of My Favorite Friends! – Post #2

PrintWelcome back to our Virtual Designer Shop Hop!  I hope this post finds everyone in good health and enjoying  your “stay at home” time!

I bet you all are getting sew much done and stitchin’ up a storm…..I know I am!

As I promised in my last post, I’d like to introduce to you to a few more of my favorite pattern designers and colleagues from the quilting  industry….. here are ten more quilty websites for you to explore in the next few days while we #stayathomeandhop or #stayathomeandshop!

As before, all of these quilty businesses are super eager to greet you – our stay at home hoppers – and are offering you super special greetings and/or incentives when you hop over to their websites!

spring sale


And speaking of specials – be sure to check out our Colourwerx Spring Special – right here! It’s on sale and over $10.00 off this week only!

PURCHASE THE COLOUR RIPPLE KIT HERE!


Click the link to take you to that designer’s shop!

Studio R Quilts
https://www.studiorquilts.com

Toadally Quilts
https://www.toadallyquilts.com

From Blank Pages
https://www.fromblankpages.com

Cotton Street Commons
http://www.cottonstreetcommons.com

Puppy Girl Designs
http://www.puppygirldesigns.com

Phoebe Moon Quilt Designs
https://www.facebook.com/phoebemoondesgins

The Devoted Quilter
https://www.devotedquilter.com

Christa Quilts
https://www.christaquilts.com

Stitched by Susan
http://www.stitchedbysusan.com

Tamarinis
https://www.tamarinis.com

I’ve got even more online shops and websites to share so be on the lookout for those later this week!!     Meanwhile, stay safe and go forth and explore my friends and have fun!  You never know what you might discover!!

Happy quilting!  xxoo L&C